This section allows you to view all posts made by this member. Note that you can only see posts made in areas you currently have access to.
Messages - Sammconn
Pages: 1 ... 74 75 [76] 77 78 79
3751
« on: March 17, 2015, 11:43:28 AM »
Well I can speculate. We were manning a checkpoint and providing SAR for a dogsled race. Our primary comms were sat phones. They did not work so good, not at all on the eve of these pics, and very sporadic the next two days. So I'd assume there is a lot of energy envolved.
3752
« on: March 17, 2015, 09:41:49 AM »
3753
« on: March 17, 2015, 09:39:54 AM »
Ok, here are a few shots from "up North". Start with the selfie...  Part of our camp. 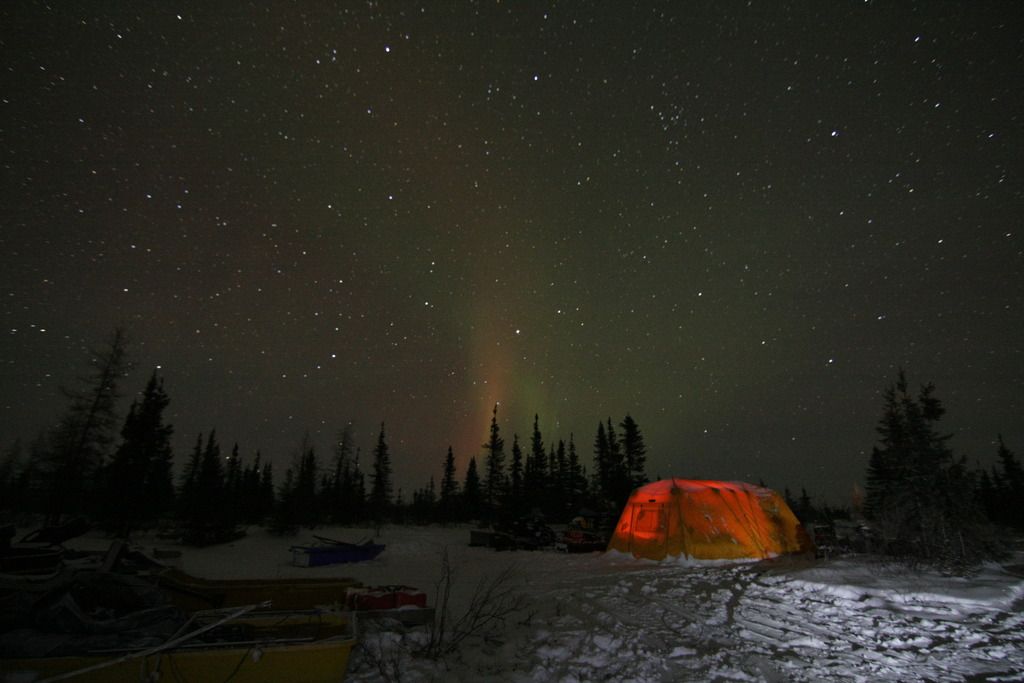 
3754
« on: March 17, 2015, 09:36:44 AM »
Wow, that is some serious sand blaster!
3755
« on: March 16, 2015, 08:02:48 PM »
Supposed to be around 5 here, wait all this weather talk and it was a picture of a skillet filled with BACON!!!! Bacon make everthing better!
3756
« on: March 16, 2015, 06:58:56 PM »
Well tonight is rehydrate and eat up night. I've been out n the bus for the last five days and I'm down on water and food.
So, a few pieces of fried chicken, a couple pounds of hot wings and some fries.
A gallon or two of water and then we'll see how I feel.
Been on the skidoo since 10:00 this morning, little to drink, none to eat, yeah should plan better, but we had all kinds of rain, and 50 ish degree weather yesterday, so it was just git 'er dun today.
3757
« on: March 16, 2015, 05:37:40 PM »
Well just got back from a trip up north. I had one of the best shows I've seen ever one night. I need to sift through them and I'll pop a few more up.
3758
« on: March 11, 2015, 01:30:57 PM »
Looks real good.
I see a lack of 'mandals' tho!
3759
« on: March 11, 2015, 11:20:19 AM »
From what I've been led to believe, you and three buddies would be able to remove the bed fairly easily.
3760
« on: March 11, 2015, 09:49:24 AM »
That bag looks good. Maybe short on some molle but may be like you say a good stash bag.
3761
« on: March 11, 2015, 07:36:40 AM »
That is one thing that I found out too.
That the smart chargers are too dang smart.
There have been a couple times I've had to dig out an old one to get a 'bit' of charge on a battery for the smart charger to take over.
Good to see you have it sorted, and can't wait to see how the hubs turn out.
3762
« on: March 10, 2015, 10:42:08 PM »
Ah come on now Big D. Wiring isn't slow, just keeping it orderly and neat and...well I guess you could get away with saying its slow. 8)
3763
« on: March 10, 2015, 01:31:27 PM »
Now there is a must try it out. Thanks!
3764
« on: March 09, 2015, 10:29:36 PM »
3765
« on: March 09, 2015, 10:28:35 PM »
Welcome.
3766
« on: March 09, 2015, 10:27:52 PM »
Welcome!
3767
« on: March 09, 2015, 10:15:55 PM »
We lost another fine man last week across the pond.
Seen this and though how appropriate.
John 15:13
Greater love has no one than this: to lay down ones life for ones friends.
Rest easy Sgt. Doiron.
3768
« on: March 09, 2015, 05:50:47 PM »
I forgot I had this one. Wish I had my settings a bit better, but it's ok. 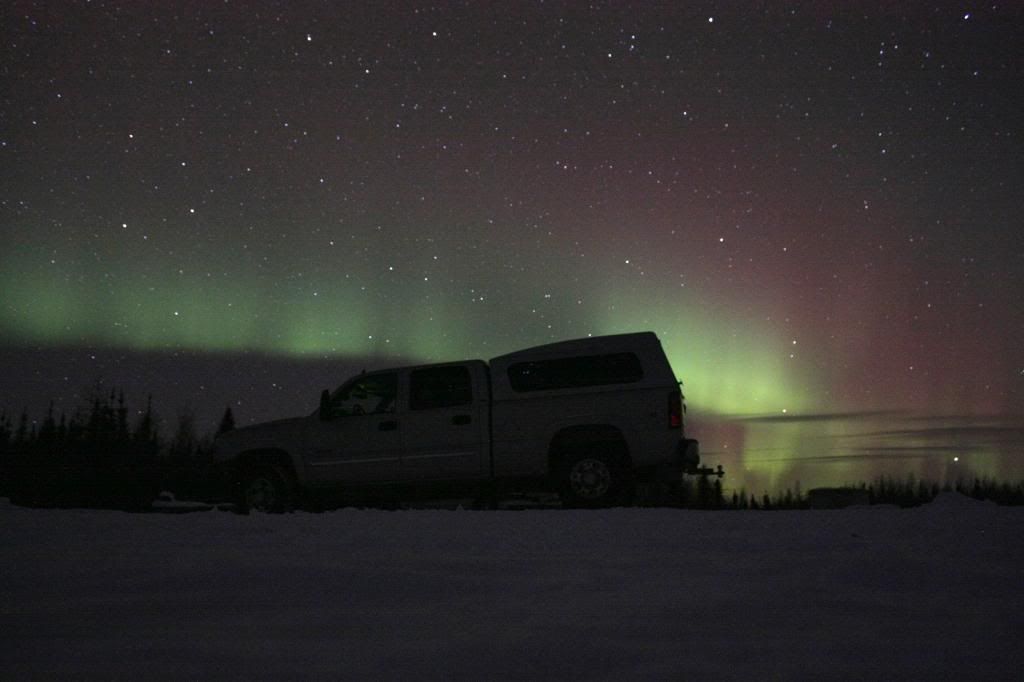
3769
« on: March 09, 2015, 03:24:18 PM »
Man, that truck looks real good Kyle. You'll be happy with it.
Never thought to snap a pic of mine this weekend, it got it's annual bath...lol.
Not quite that bad, but it's sure showing its mileage on gravel compared to how yours looks.
I'll grab one tonight if I remember.
3770
« on: March 09, 2015, 07:38:38 AM »
Welcome. It's nice to see the younger generation on here too.
3771
« on: March 09, 2015, 07:36:30 AM »
Do most saws have an similar oiling system?
Without knowing for sure I'd say some fasion of similar. Would be a similar drive set up I would think but I'm not sure if it would be the same. Not a lot of options for the different manufacturers to do the same job. I've never had problems with my Stihl, best bet is to see if YouTube has anything.
3772
« on: March 08, 2015, 09:00:02 PM »
Amen.
But first you need to get Square D going... 8)
And I know that has progressed to Guinness World record oil change.
Pokedon!
3773
« on: March 08, 2015, 08:58:04 PM »
Funny story about mine too.
A friend in town liked our old couch that we were selling.
he wanted to make a deal, so I said sure.
I got the saw and cash to boot. I was expecting to give the cash, not receive.
I've used up a bar and a lot of chains on it. It has been to all corners of the north in my sleigh or quad.
By far my favorite saw, just hope it doesn't come to an end like yours.
3774
« on: March 08, 2015, 08:54:32 PM »
I can't exactly remember, back 20 some years ago, I was a you lad with a Trans Am.
The hood was like that when I bought it.
If I'm thinking right, I ended up using the adjusting slots, and put a tilt into the mounting.
So where you went all the way down, I think I was high on one end and low on the other.
But I could be all full of it to and have this backwards... :-\
Like I said, I was 17, and the year was '90.
The good news is that it's an easy experiment.
3775
« on: March 08, 2015, 08:48:52 PM »
Good info here!
You boyz had me all konfuzed with front (Sam) going to rear (Nate) back to Sam...
But I hung in there.
I don't have a ton of faith in those wheel bearings especially with a setup like mine where I have slightly offset (to the outside) wheels and larger tires. So far, so good, but I'm only at like 46,000 miles
That was one thing that stands out, the lifted and larger offset seems to load up the steering a lot. I'm stock, and after all these years and miles, probably lower than stock, and this has probably maximized the life of my front end stuff.
3776
« on: March 08, 2015, 08:46:01 PM »
Hope I'm not posting right in the middle of your write up, but I have a husky and a big Sthill. The Husky stopped oiling as much as I think it needs to last season. I'm going to do this procedure on it and hopefully fix that before I burn up my bar
No you caught the end of it, and no biggie anyhoot. From what I found, this is most likely the reason, and less often is the pump drive that is keyed to the sprocket.
3777
« on: March 08, 2015, 08:44:32 PM »
Cleaned everything all up, reassembled the oiling system and saw enough to start it to test. Well, I have oil again.  Finished up the assembly and put it away to return to the cabin. I go through a fair bit of wood each year (3-4 cords), I'm no lumberjack, but I do spend a fair bit of time on the saw. I have mixed feelings on this saw, it is very heavy compared to my Stihl 025, but I like the power. My 025 is a bit cranky with temperature changes, but typically is my go to saw. I think it is 2 1/2 to 3 pounds lighter, and at the end of the day that does matter.
3778
« on: March 08, 2015, 08:38:10 PM »
Cleaning out some debris around the pump supply. 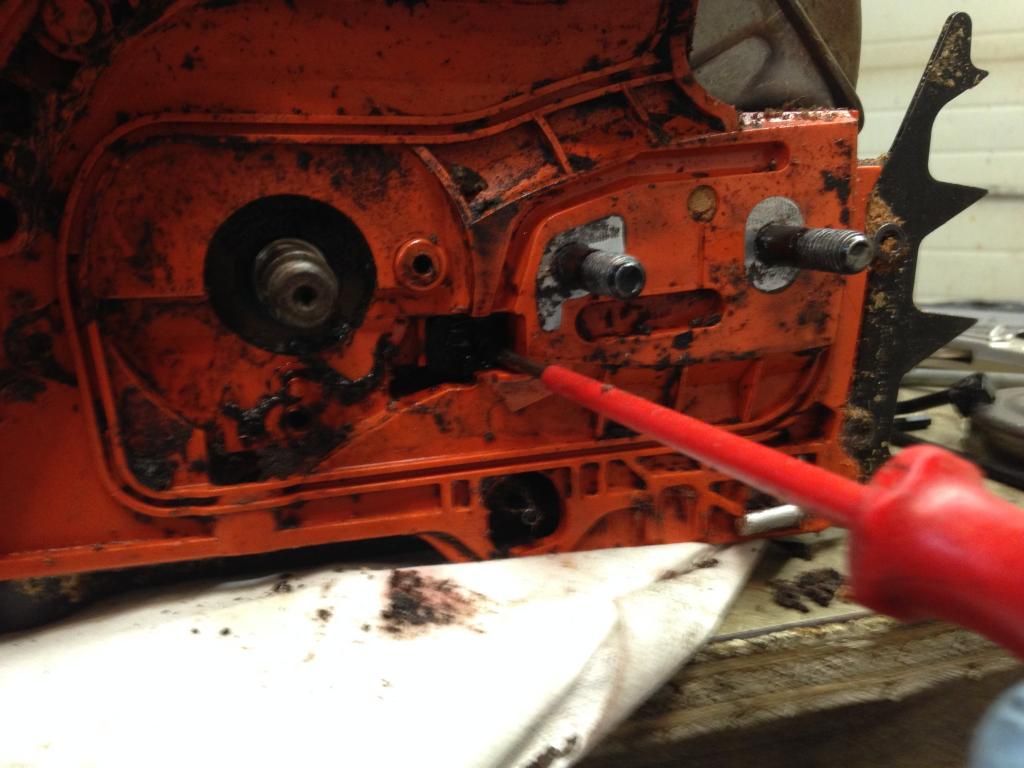 I added a lot of high speed air, cleaned up all around, then a little shot backwards into the tank. 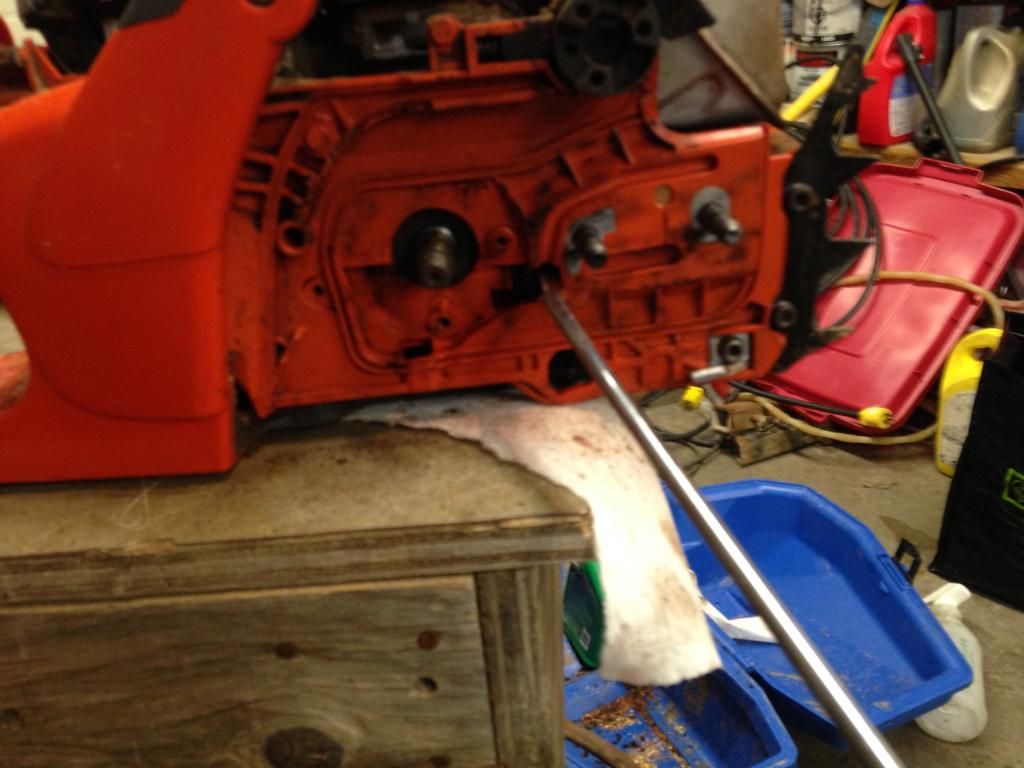 There was quite a lot of sawdust in the oil tank, and this is likely my problem. Flushed the bar oil tank to clean out all of the shavings.
3779
« on: March 08, 2015, 08:31:09 PM »
The clutch is removed by unthreading, then the drive sprocket comes off with a roller bearing. The drive gear for the oil pump is next to come off. This is one of the failure modes for the oiling system on these saws. Mine was still good, and indicated a possible blockage to the inlet side of the pump. 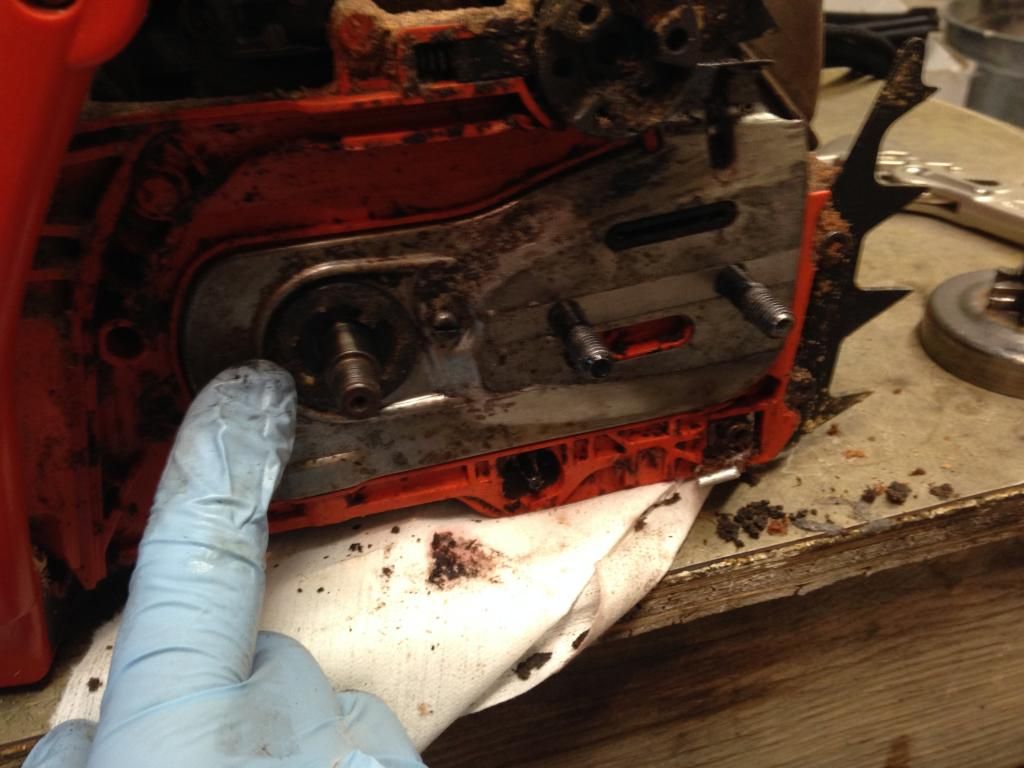 The pump drive and cover off. Oil pump is secured by this allen screw. 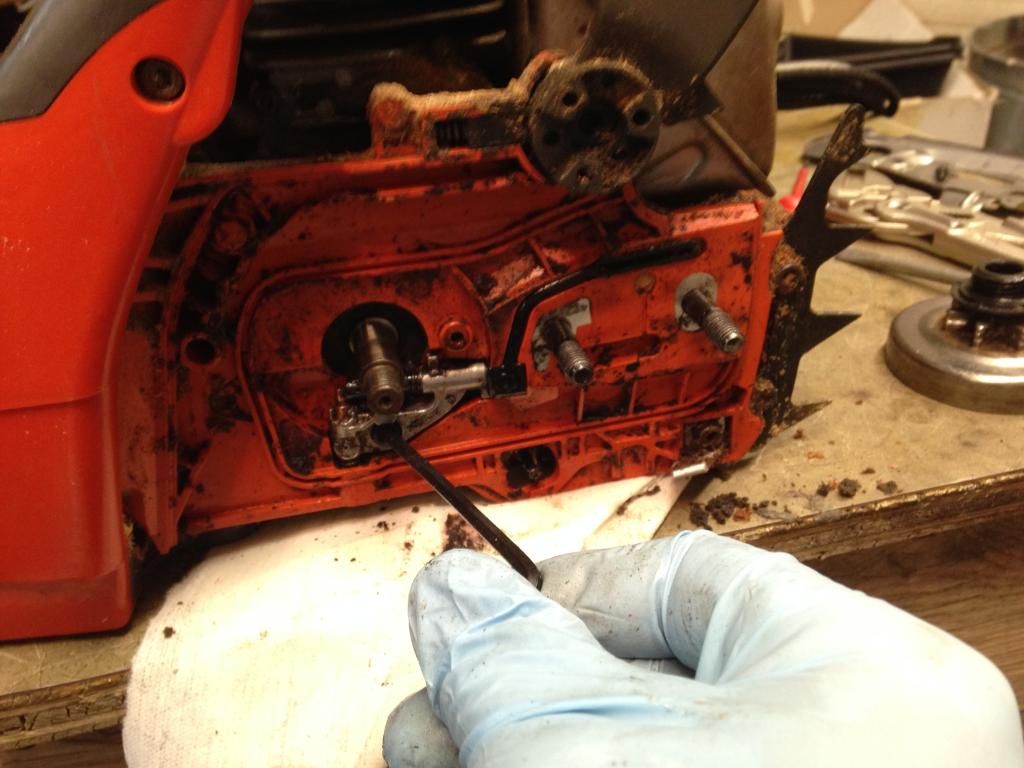 Here is the oil pump removed. A quick rotation of the drive gear pushed residual oil out, so pump appears good. 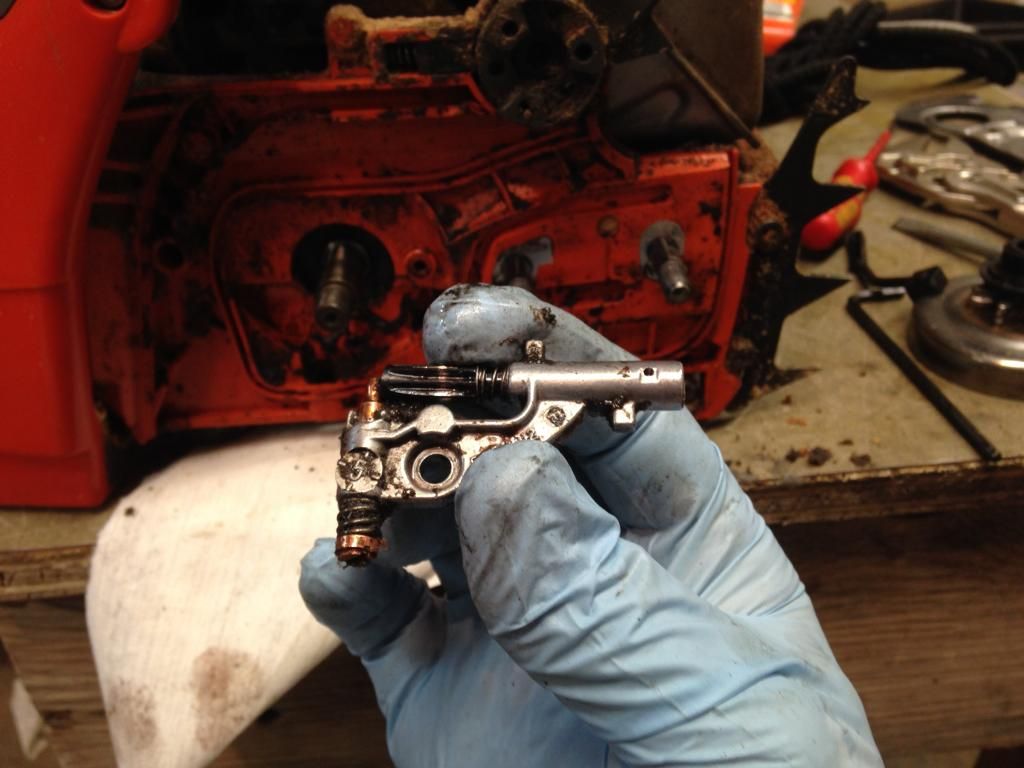
3780
« on: March 08, 2015, 08:25:50 PM »
So last weekend I was out trying to cut up a bit of firewood for the cabin. I noticed I wasn't getting as much oil on the chain as I should be. Did a little searching and found it's a pretty common problem, and a pretty easy fix. You start off removing the chain and bar, top cover and spark plug. Then stick a couple inches of cordage into the cylinder. 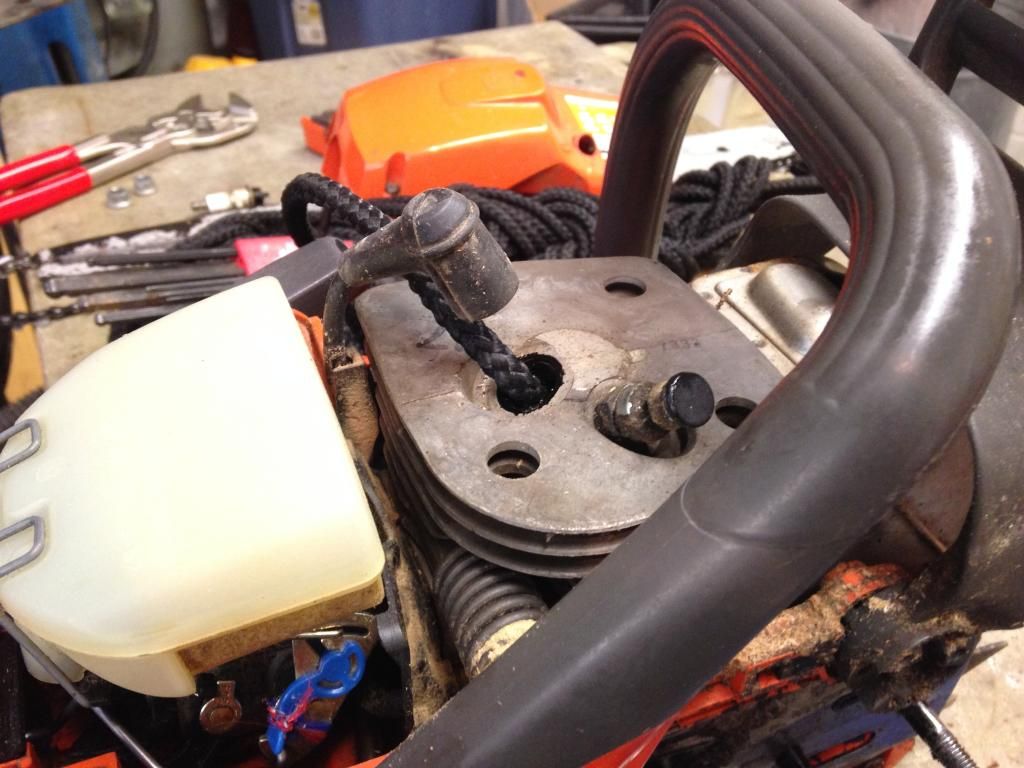 Then you remove the clutch, pliers to grip the clutch, another set to turn it in the "Off" direction. The cordage stops the piston at the top of the stroke, enabling the crank to stop rotating. 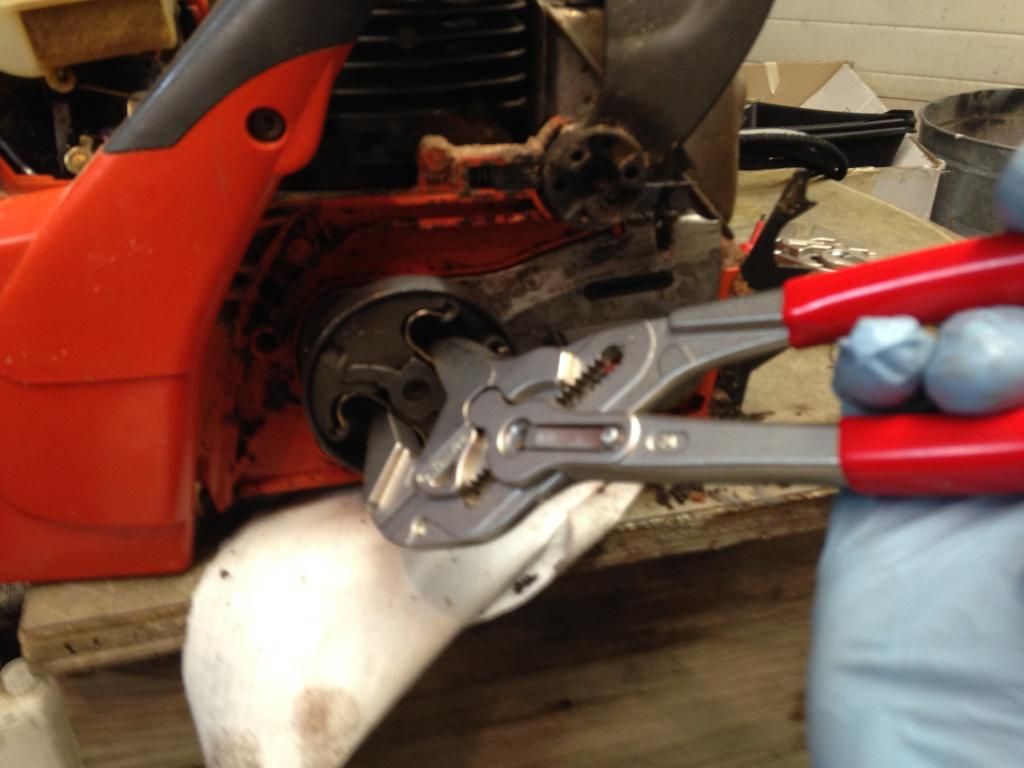
3781
« on: March 08, 2015, 07:54:17 PM »
3782
« on: March 08, 2015, 07:49:45 PM »
A few more from this winter. Gotta get the truck in them when I can. 8) 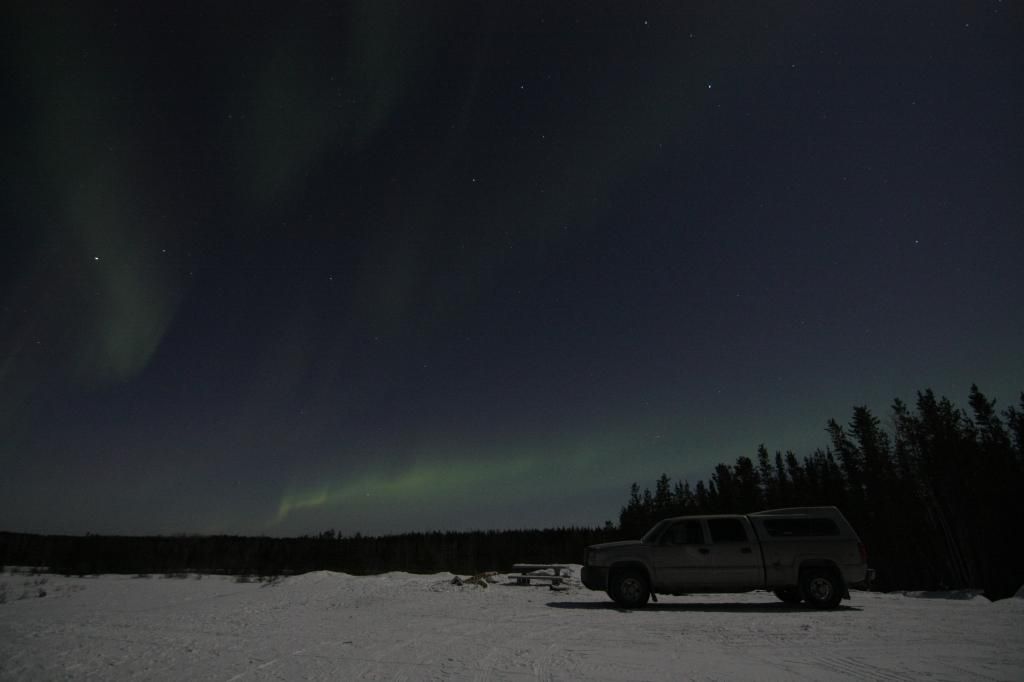 This is my play sled, was my all around up till a couple years ago.  And here is my workhorse of these days.  All from different nights and locations.
3783
« on: March 08, 2015, 07:39:44 PM »
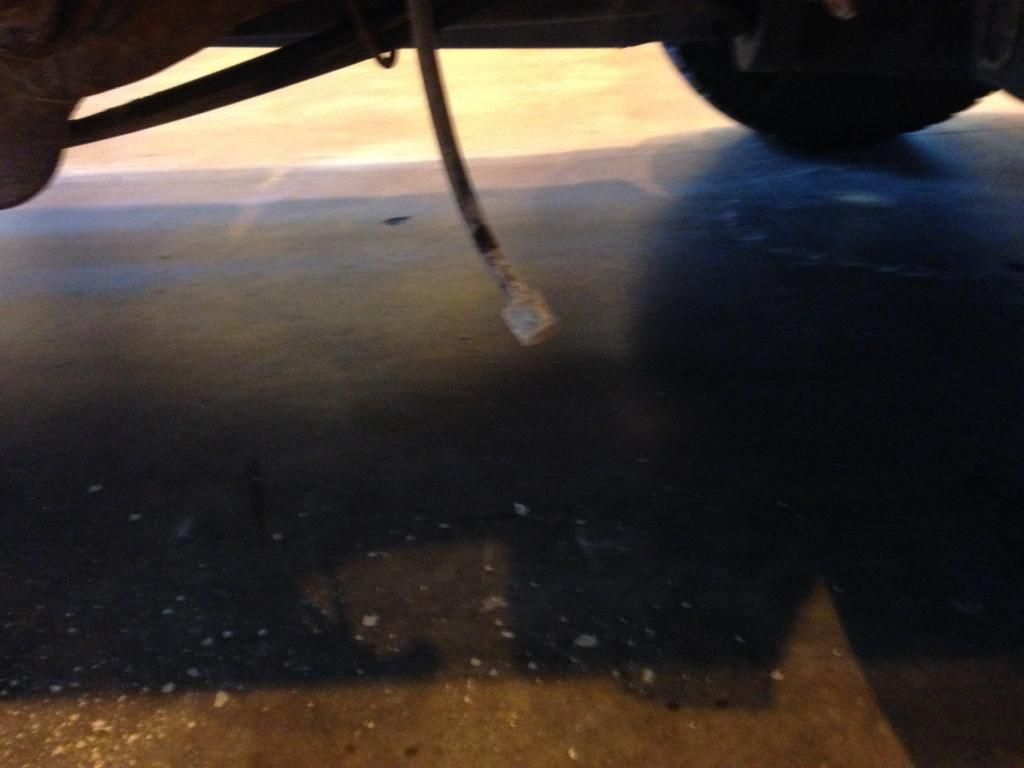
An aside for anyone who is having troubles keeping axle seals, ie: blowing on a regular basis, check your diff vent.
On mine it is tucked away safely by the fuel fill hose, and likely is still on the NBS trucks.

This is the second and third time I've had seals go, but this time was both, so I checked my vent. It was clear, so may have just been that it was a lot of miles on them.
Here it is, dropped down to clean up. There was a bunch of dirt on and around it, but not plugged up.
3784
« on: March 08, 2015, 07:38:24 PM »
An aside for anyone who is having troubles keeping axle seals, ie: blowing on a regular basis, check your diff vent. On mine it is tucked away safely by the fuel fill hose, and likely is still on the NBS trucks. This is the second and third time I've had seals go, but this time was both, so I checked my vent. It was clear, so may have just been that it was a lot of miles on them. Here it is, dropped down to clean up.
3785
« on: March 08, 2015, 07:34:34 PM »
New vs old wheel bearings. Clean up the spindle if you collect mud/dirt like I do, transfer the dust shield over to the new bearing and install. 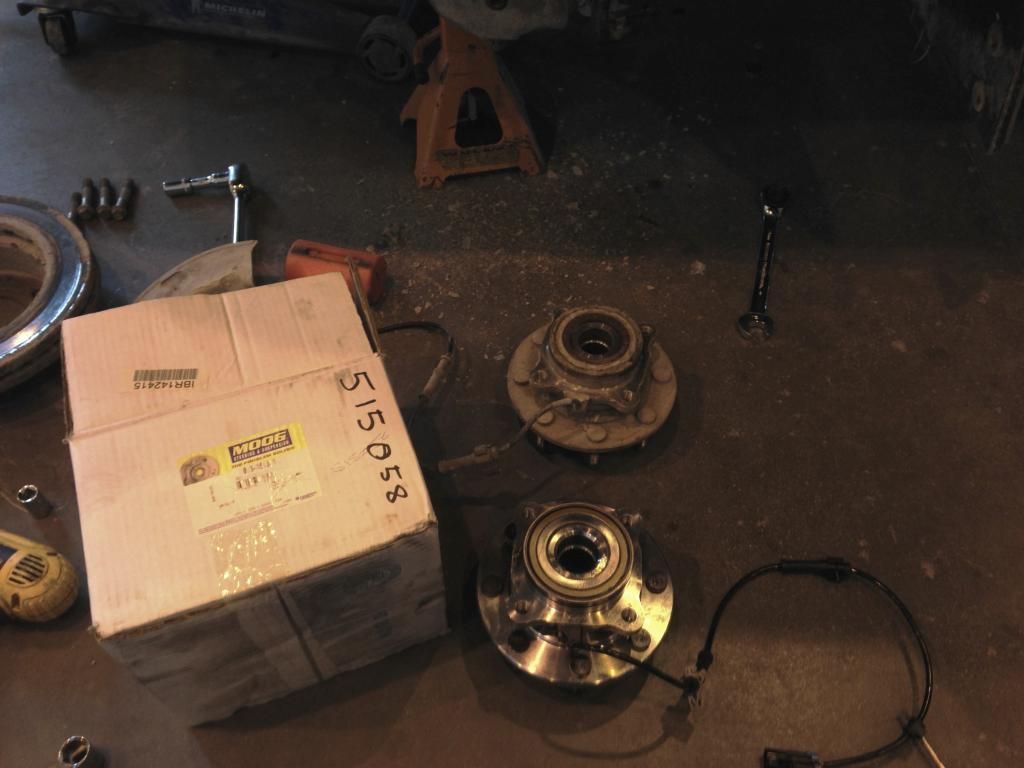 I think I torqued the four bolts to 140 ft/lbs. Then torqued the axle nut to 230 ft/lbs. Installed the new pads and rotor and buttoned it all back up.
3786
« on: March 08, 2015, 07:28:25 PM »
This wheel bearing scared me when I jacked up the truck. There was a ton of play in it, and definitely needed to be done. I had to do the other one in the fall, for whatever reason I was ale to get well over 170k on the first, and 184 on this one. Removal of the axle nut requires a 36mm socket, a 2 foot breaker bar, 4 wheel drive engaged, and more than a whole lot of grunt. I'm a pretty big guy, 6 foot 250, and it was about all I had to break it loose. 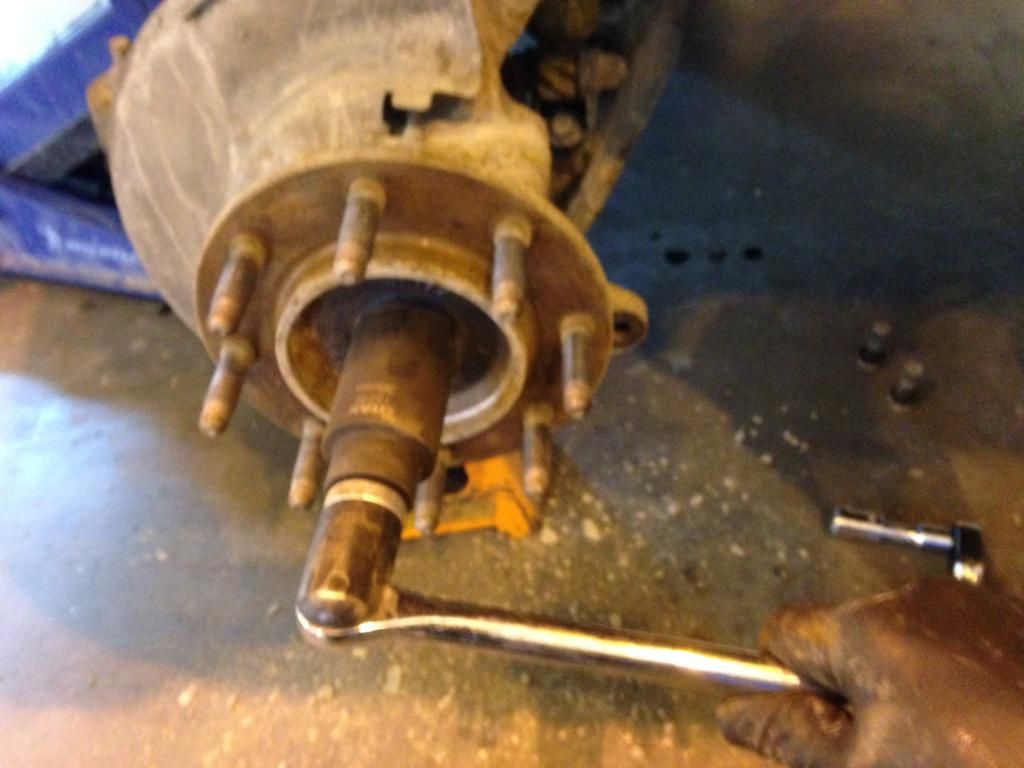 Take this opportunity to unhook and unclip the ABS sensor before loosening the four spindle bolts that hold the bearing assembly on. 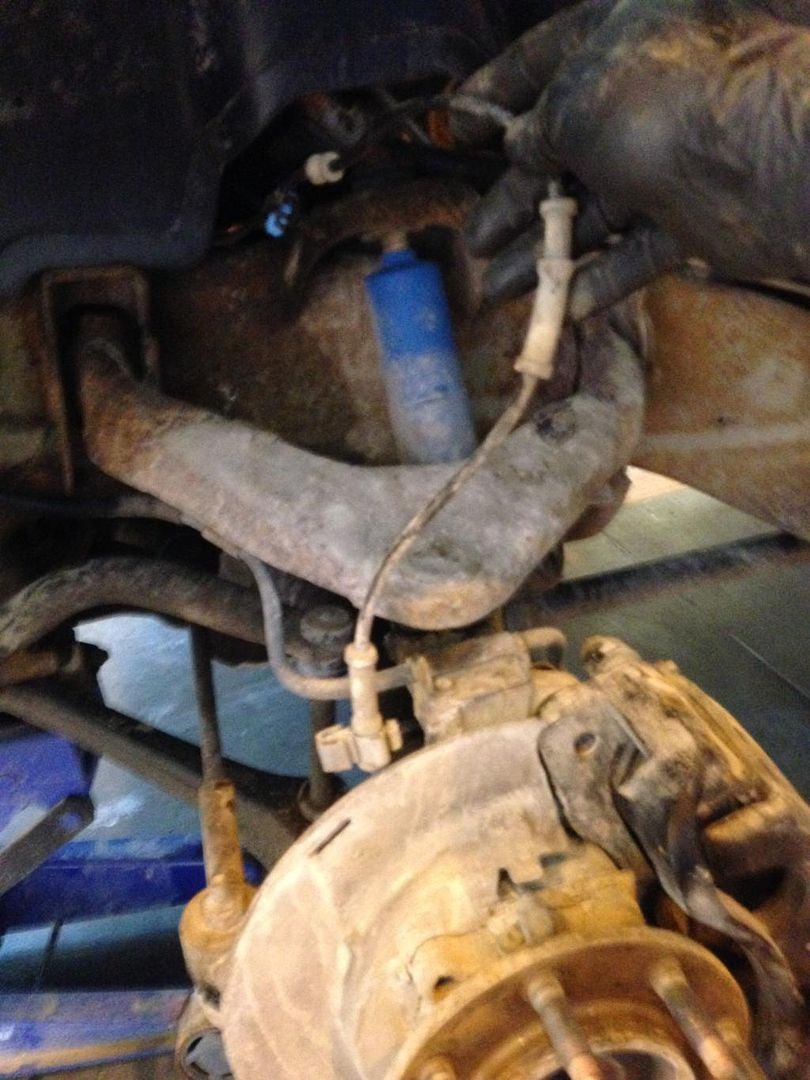 Then remove the four 15mm bolts that secure it, and remove the bearing. 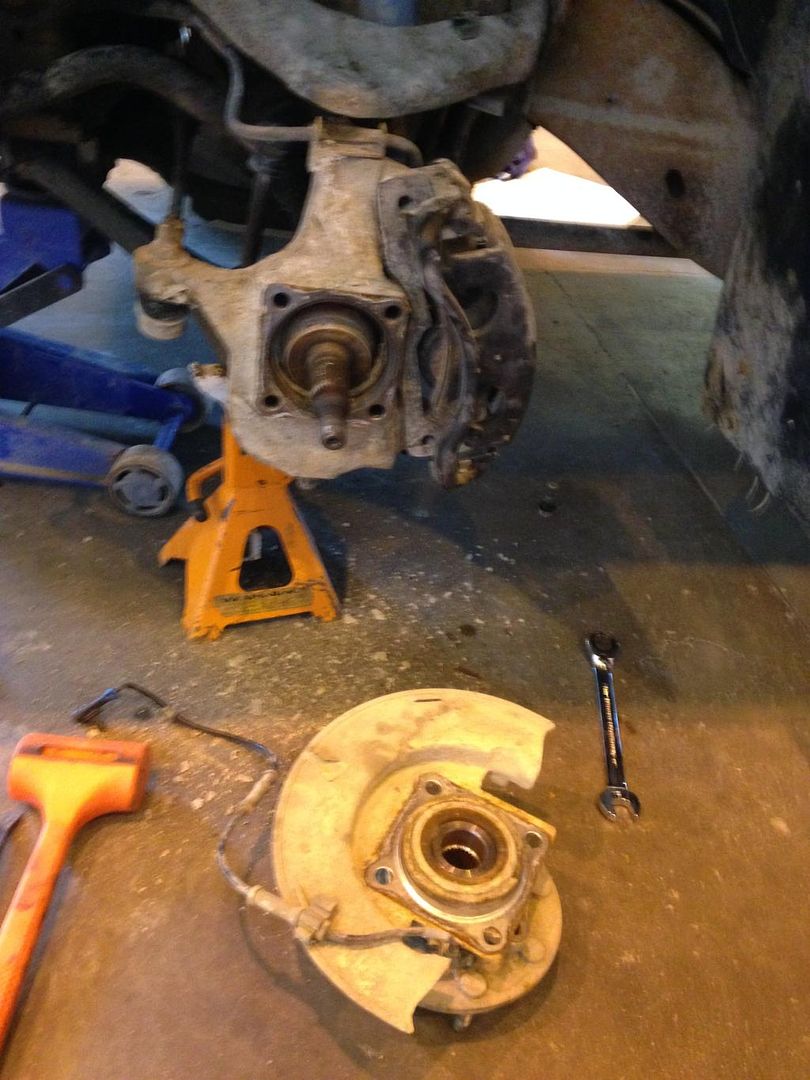
3787
« on: March 08, 2015, 07:21:52 PM »
So on to the front, jack, support, pull wheel. The caliper is removed, split in half and resting on the upper control arm, and rotor is off in this picture. 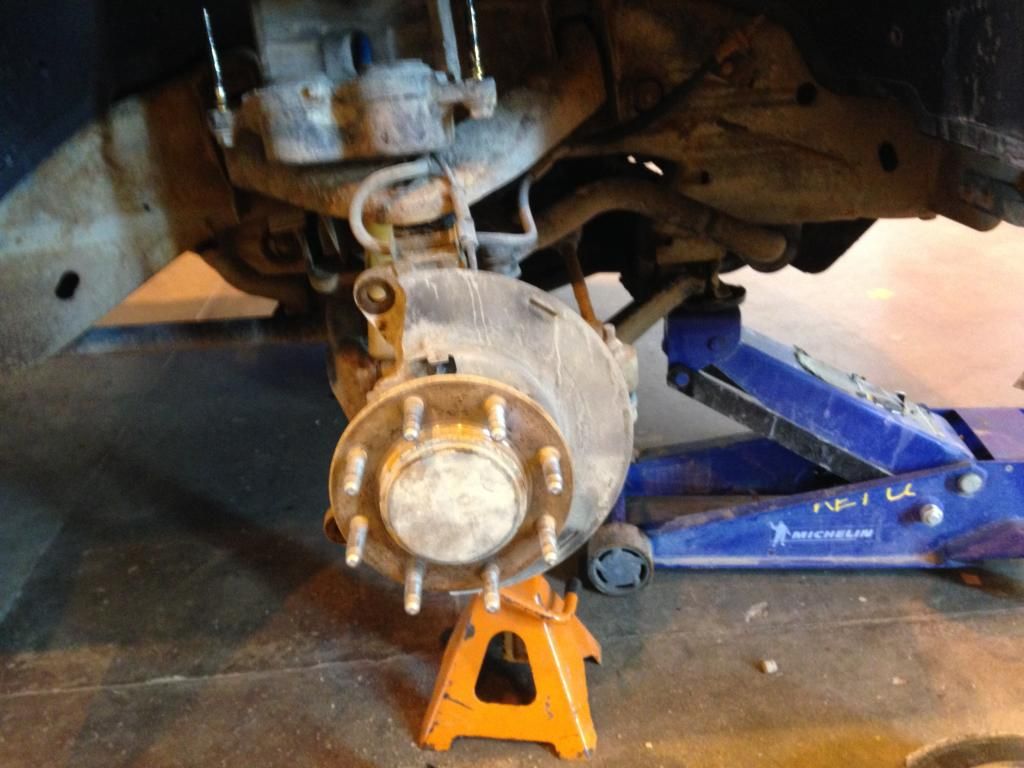 Here is the new and old rotor, and the other half of the front caliper. This is why the fronts are being replaced. 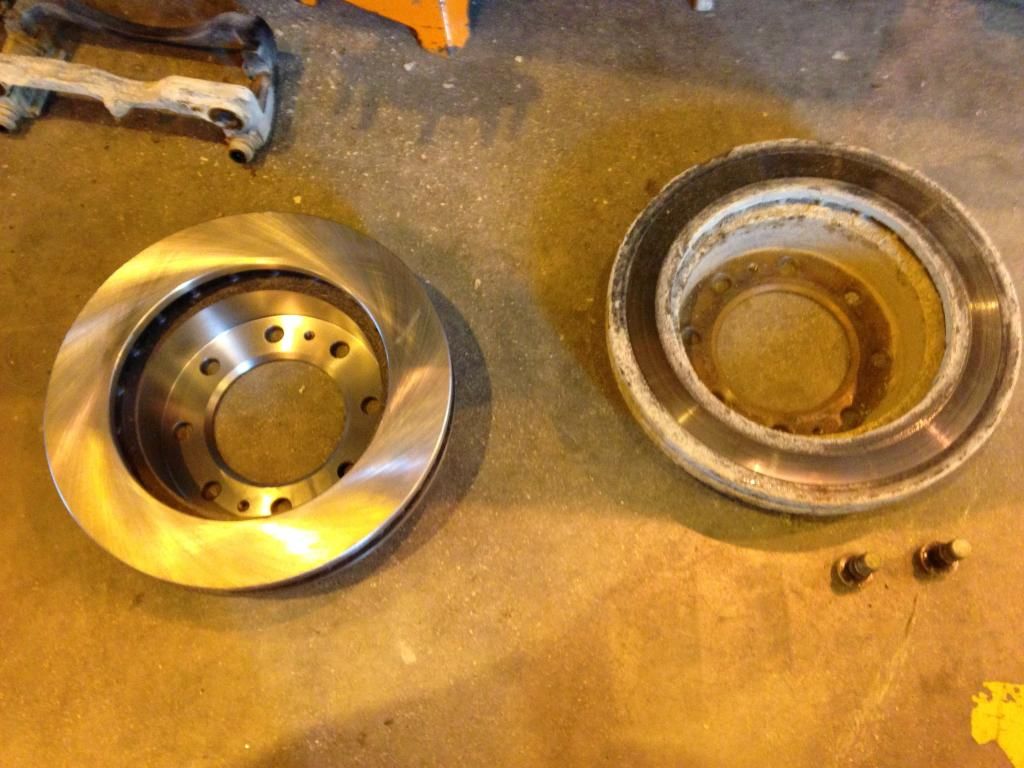 
3788
« on: March 08, 2015, 05:13:49 PM »
Ok you've caught me as I took a break. I'll continue to roll in this one.
3789
« on: March 08, 2015, 04:12:44 PM »
So, first up break wheel nuts free, jack and support the rear axle. Remove rear tire, and you're ready to begin. 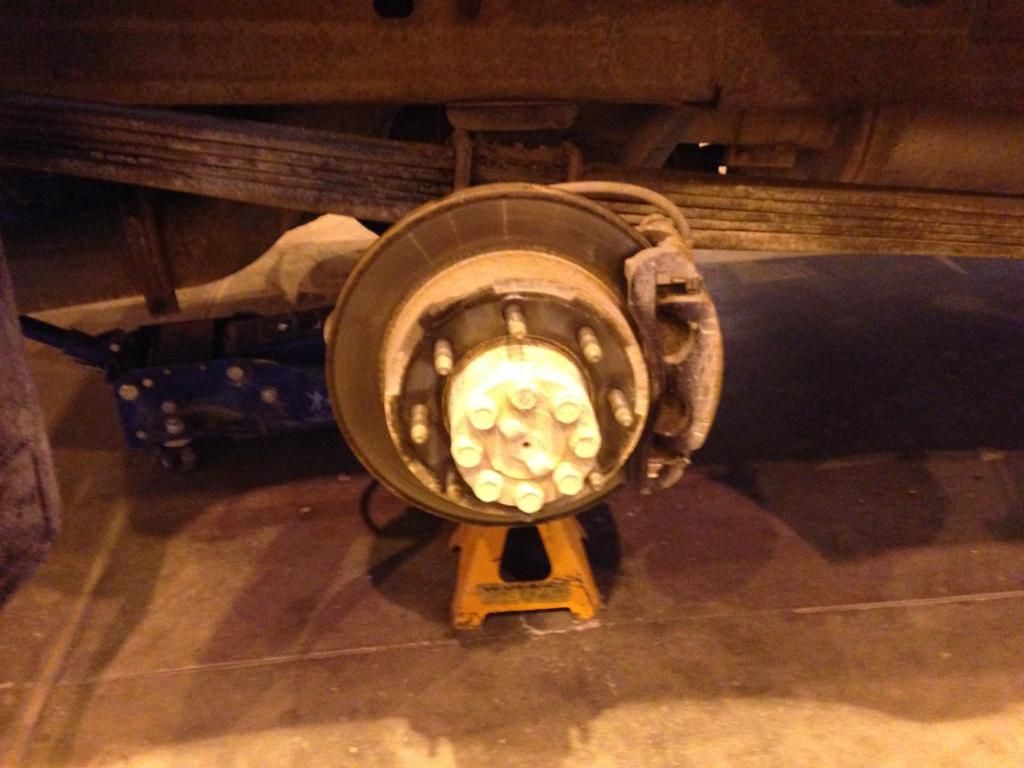 Most likely you'll need to spray the rotor/hub mating point, as they'll be fused together with rusty goodness. Let the PB Blaster soak while you remove the caliper, set on rear leaf, or if they are being replaced it could be removed. If you have the annoying "clunking" sounds over bumps, it may be your caliper pins are worn. This is a common problem, and the re-pin kits I used did not last very long. I picked up remans for a very reasonable price a couple summers ago while on vacation in Ohio, and they are holding up well. You can then begin trying to get the rotor off the hub. \this is where the hammers come into play. I smacked around over under etc to shock the rust free. Then used pry bars as a striking face for hitting outwards against, as the dust shield covers much of the rotor. 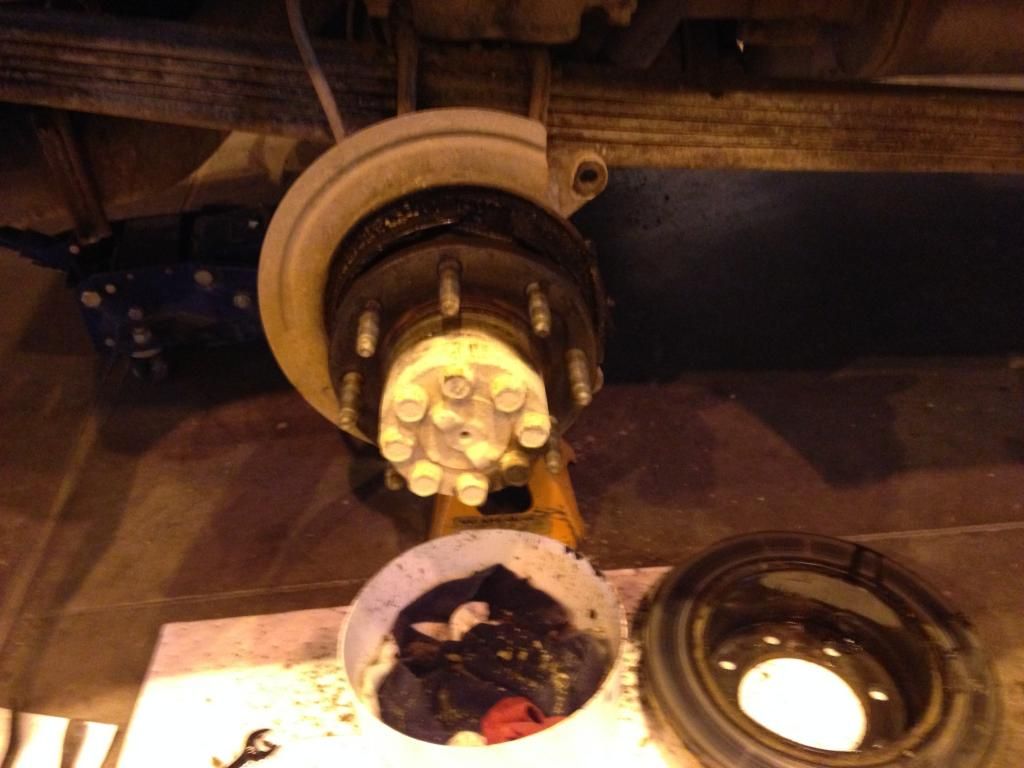 And here is the ugly proof of the required axle seal change. 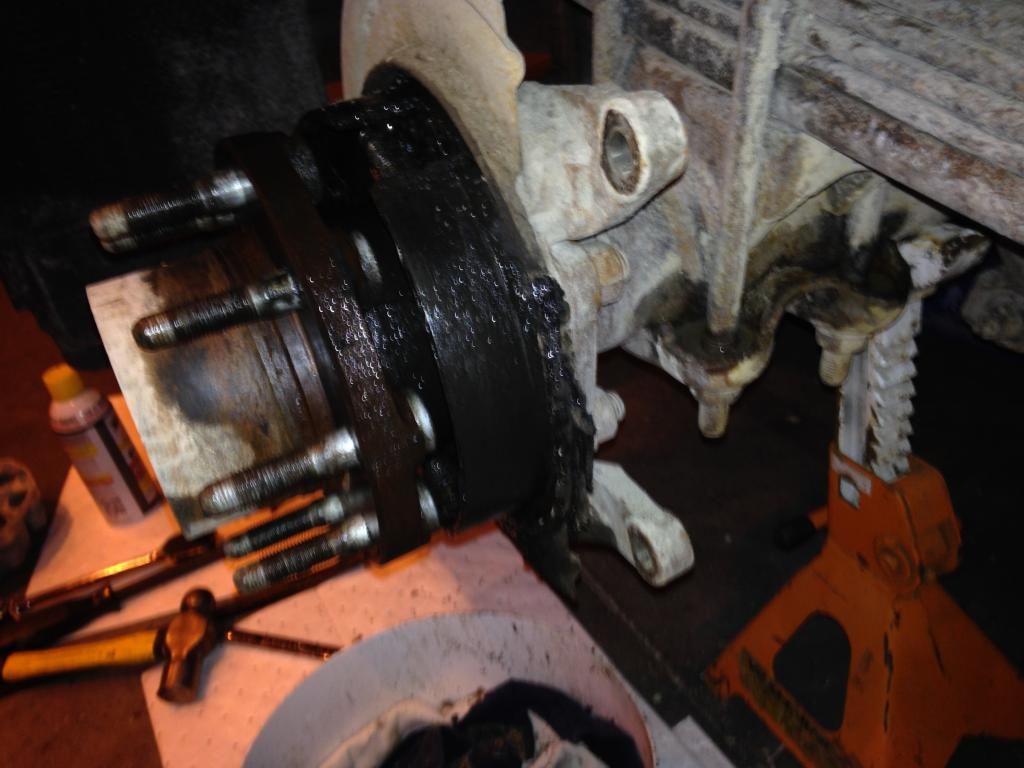
3790
« on: March 08, 2015, 10:51:31 AM »
Now there is some serious smoke. And my mouth is watering now.
3791
« on: March 07, 2015, 08:14:40 PM »
Maybe consider replacing the wheel bearings as well while you have it all torn down????
Did one last fall. The other was on my list too. Just got to sort out all the pics and I'll be putting a few up. I'm thinking to do the whole lot under this one thread. Thoughts? And if so we'll need to rename it to cover brakes, axle seals and wheel bearings.
3792
« on: March 07, 2015, 07:34:10 AM »
This new section should be a hoot. It may concentrate the DOT's but it won't contain all of our activities. JR's DOT's gone wild made me laugh pretty good.
3793
« on: March 06, 2015, 11:17:30 PM »
So I managed to get a whole lot done today.
Did second axle seal and rear brake replacement.
Changed front rotors/pads and drivers front wheel bearing.
Rear diff oil change.
Power steering hose replacement and oil change.
And was done by 15:00 this afternoon.
Whew! Needless to say I was busy.
3794
« on: March 06, 2015, 11:16:57 PM »
Tool list: (best my memory can reproduce)
Sockets 1/2" drive - 36mm, 22mm, 21mm, 19mm, 18mm, 15mm
Extensions, ratchet and torque wrench
Wrenches in some of the above sizes as ratchet is too big for removal of some bolts.
Hammers - dead-blow, big ball pien or other large hammer
Pry bars and scrapers
Pliers - various
small flat screwdriver or pick
PB Blaster, brake clean, alcohol (methyl, isopropyl), cleaning brush
I have replaced my calipers previously so the required tools for that bit escapes my mind.
3795
« on: March 06, 2015, 11:16:12 PM »
So, at 296,xxx kms, 184,xxx miles my factory brakes have finally started to say we're done. I'm amazed how well they have stood up. Guess it shows I use the go pedal far more than the whoa pedal.
I've gathered all my parts I hope, and began the task tonight.
More to follow with pics through the weekend.
Have bad axle seals as well as it turns out, and one more wheel bearing to change, so I'm going to lump everything together as it all happens together.
3796
« on: March 05, 2015, 10:00:43 PM »
I agree. Stay in part 5 until momentum shifts direction.
The bumper builds would be a good turning point.
3797
« on: March 05, 2015, 07:58:23 PM »
The water/alcohol tank has this 1/4NPT outlet which I plugged up with the correct fitting
It seems you have some frame rust at the alchy tank that mustn't have been caught/coated on the frame prep. I'm sure you saw it as you took the picture or posted it and have plans for some more undercoating. Looks like you are only a few short days...hours...from firing it up! Press on and START IT for us all! :)
3798
« on: March 05, 2015, 07:17:32 PM »
OK picture time.
Picture time because judging by the nature of the questions I get, no one has read anything! Ok, kinda just kiddin', sorta...
Welp, the problems yielded to some solutions again today as more things got solved. Starting with the front driveshaft, today was more of project GTSOTF (Get the stuff off the floor)
That drive shaft has been kicked and shoved all over the garage and beat up, kind of like a Comet's trip around the solar system, that driveshaft has been everywhere. It survived because it was too heavy for the red dog to carry off so for now I'll use it, but probably go to something a bit stouter in the near future.
I cleaned on it for about a week, and here is what it looked like:
Wow did that ever get beat up. Looks like the red dog was using it as a chew toy!
3799
« on: March 05, 2015, 05:34:37 PM »
Well that will keep the not so properly fitting fender straighter than the welded one did!
And they'll look good. Using the same hardware for the Louvre vents?
3800
« on: March 01, 2015, 08:46:33 PM »
Looks awesome Kyle.
I'd jump on getting the EGR blocker in sooner than later tho.
To do it without EFI you need a 'finger stick' to block the codes.
I really feel stopping the soot is a high priority.
In any case looks like a sound plan. I did the Profab downpipe, it fit like a dream and we're lucky enough that it is very easy on the LBZ.
Pages: 1 ... 74 75 [76] 77 78 79
|


