This section allows you to view all posts made by this member. Note that you can only see posts made in areas you currently have access to.
Messages - Bear9350
851
« on: January 25, 2016, 01:48:00 PM »
I almost bought that same gun when i was looking, but opted for the Savage Model 16 with the sporter barrel, as i would be carrying in the field...
The 700 SPS is definitely nice though for the money.
I have spent a lot of time looking at the Savage model 16/116 also. My .223 is a Savage Model 16 and I really like it. But with the Savage priced about $300 more I can spend $150 on a Timney trigger for the Remington and have another $150 left to spend on ammo.
853
« on: January 25, 2016, 01:10:40 PM »
Haha yes that could be a problem. But I won't be using PTO at all. I want to hook it direct drive to the engine and have the engine turn it at 1800 rpm. It would be great in my garage to provide power to the house when we have an outage, and also handy to use farming to run grain cleaners or the like.
Maybe I am missing something but wouldn't that be an even bigger problem. 540 pto spins at approximately 540 rpm at full throttle. Hooking direct to the generator and spinning at 1800 rpm would be more than 3x faster. You would need some type of reduction to couple the generator to the engine.
854
« on: January 25, 2016, 10:44:03 AM »
I will be stopping into the Menard's tonight for more supplies. I will take some pics of our selections.
We have the standard 3 or 4 ply stuff that would have knots both sides.
Then the sanded one side plywood. This stuff looks pretty good on one side with knots on the other. You wouldn't want to use it for cabinet making etc.. where you would be staining but if your painting it looks ok. That is under $20 for a 4x8 sheet.
Then the expensive stuff.. sanded veneered plywood. Generally used for cabinet making etc... can be oak/ maple etc... veneer that would look good stained. That stuff is generally around $40 - $50 a sheet.
855
« on: January 25, 2016, 10:33:10 AM »
I don't have a whole lot of pics of the next month's work. With the framing done the electrical, HVAC and plumbing could be done. I hired out the HVAC and plumbing and ran the electric myself. The plumbers were great, HVAC not so much. We had to call them day after day for updates and to keep pushing them to get done. We were told if would be a 2 week job no problem. It took 9 weeks to get heat. This was in late Oct and the plumbers and myself were starting to get concerned about the possibility of pipes freezing. Nearly 6 months later I am still waiting for them to finish patching some holes they unnecessarily punched through the side of my house. Also during this time period we had a new well drilled. The old well was below ground which is not to code. For about 2 grand we could have extended the well casing above ground. If we did that there was still a chance the old well casing would not be deep enough to be to code. Also we has border line high nitrates in the water. The well driller we spoke to new the area well and guessed the old well was only about 30 feet deep. We decided it wasn't worth trying to save the old well and shelled out a little more to have the new one drilled. I believe the new well is a little over 110 feet deep with low nitrate levels. When they capped the old well they did confirm it was about 35 feet deep and never would have been able to be brought up to code. 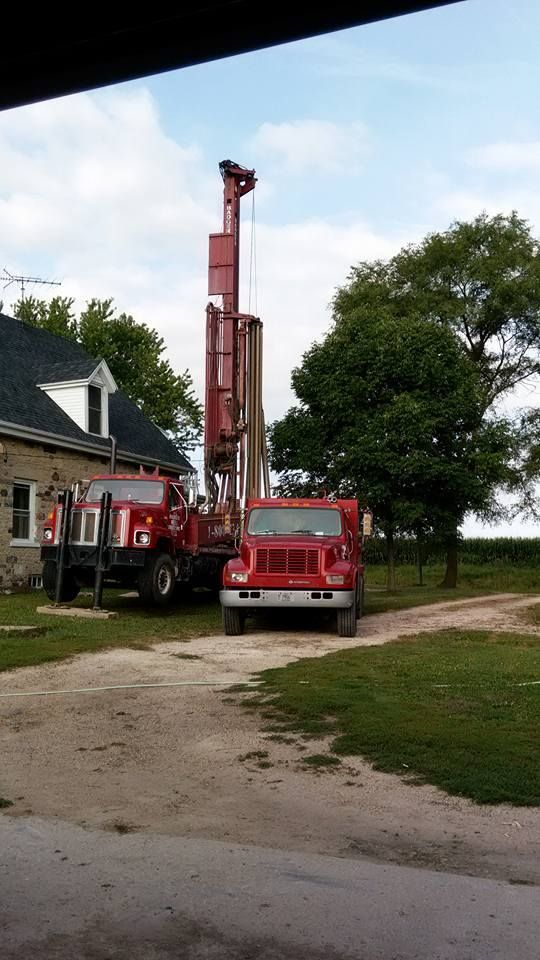
856
« on: January 25, 2016, 10:22:29 AM »
857
« on: January 25, 2016, 10:16:01 AM »
You can get a handheld metal detector wand and pull all the nails. Yes it's a pain, but you could then sell it at a premium since it is de-nailed :)
The FIL has a couple of them. He does some metal detecting. I could probably get the majority of them out this way. Remember these nails are over 150 yrs old. It does not take much for them to break off.
858
« on: January 25, 2016, 09:06:04 AM »
Dang that is expensive for 1/2 ply!
Sent from my iPhone using Tapatalk
I hope he meant $17?? Atleast that would be close to sanded one-side 1/2" ply for me.
859
« on: January 21, 2016, 01:23:21 PM »
It has been a few years since I have looked into this. A lot of people run distilled water in the summer and washer fluid in the winter to keep it from freezing. From the reading I have done tap water is not advised due to minerals and other possible contaminants in the water.
860
« on: January 18, 2016, 06:33:23 PM »
I had considered the 30-06 a little but hadn't put much thought into it. Nobody send to talk about that caliber much even though they are pretty common. Already around here it is not considered very often even though alot of guys hunt with them.
861
« on: January 18, 2016, 04:02:35 PM »
Ideally I would like something I can shoot on the range regularly but occasionally hunt with. This wouldn't be replacing my normal deer hunting rifle, a Remington model 7600 in .270. This would be the gun I stand up in the corner of the hunting shack in case the big buck decides to appear at the edge of the field 300-400 yards out while everybody is standing around bs'ing.
I already reload for my .223. That gun I purchased to have as a range gun and normally shoot a couple times a month.
862
« on: January 18, 2016, 02:45:36 PM »
For 300 meters, the .308 is more than adequate. It is an effective cartridge for use out to 800 meters, possibly 900.
I assume you are talking about shooting deer sized game or paper punching or in the context of this site, a self defense caliber.
If I had shots that were typically in the far side of the .308 range, then the .300 WM is a very good cartridge. That caliber was used as a sniper gun very effectively out past 1000 yards. I own one and it has been a great shooter since the early 80's when I made it mine.
The .270 and 7mm Rem Mag are great long shooters as well. These days the 6.5 cartridges like the Grendel are way long shooters because of excellent bullet coefficient of size vs weight and power.
The standard nato 7.62 X 51 or .308 is probably about the perfect cartridge there is. Available everywhere. Powerful, Kills anything, inexpensive vs a .300 and is proven in everything from combat to long range competitive shooting to your annual deer hunt.
The other .30 cartridges are so-so in my view. The new .300 and the 7.62 X 39 rusky rounds. They have good performance in close but run out of spunk pdq.
Again we return to the .308 which is probably the standard by which other cartridges are compared.
I plan on using it for deer hunting pushing 400 yards and would like to be able to shoot it confidently paper punching beyond that. Initially I was looking at the .308 but then I read something that the 308 starts losing velocity after about 300 yards and beyond may not retain enough energy to properly expand a hunting round. That is not to say it is not accurate at those ranges. I'm pulling that out of the memory banks from some reading I did a couple months ago. The cost effectiveness and availability of ammo is definitely a plus for the .308 that is hard to ignore. Edit: I somehow managed to find the article I read that had me questioning the .308. http://www.gunsandammo.com/hunting/ga-perspectives-does-the-308-fit-the-long-range-hunting-bill/
863
« on: January 18, 2016, 01:29:53 PM »
I'm planning on purchasing something in the near future. It sounds like there are a few guys with knowledge/ experience on in this area so I thought I might lay it out on here and ask for opinions.
I haven't entirely decided what caliber I wanted to go with. First I was thinking 308 but after doing some reading I'm not sure about it. Then I considered the 300WM or 300WSM. I had a cousin that was in the right place at the right time and got a smoking deal on a 7mm mag so I started thinking about that. Also I have thought about 338.
Right now I think the .300Win-Mag is the route I would go... maybe.
Right now I would like to keep the actual gun purchase around a grand. I want to be able to afford to shoot it on a somewhat regular basis. I can shoot up to about 300 yards by walking out the back door of the house. I do plan on reloading for it though.
So if anybody has any thoughts or opinions let me hear it.
864
« on: January 18, 2016, 10:43:12 AM »
Those joists would make a heck of a country dining table. Plane them down and joint them together. My wife would be so jealous
Sent from my iPhone using Tapatalk
They would. The wife isn't to big on oak grain though. Maybe with a darker stain or something she would like it. A nice big heavy table would look great though. Maybe with a bench. I know there is more than enough out there. The only problem would be processing it. It all has nails in it so nobody is going to want to run it through their equipment. I asked the hardwood warehouse didn't want anything to do with it for that reason. Said they would never touch it with their equipment. Told me my best bet would be selling it on craigslist.
865
« on: January 18, 2016, 10:37:04 AM »
Went back through and added the pics that I missed last week. Most of the people in the pics are my and my father. My dad and brother helped a lot with the construction. My father-in-law came down a few times also.
866
« on: January 15, 2016, 06:19:18 PM »
In my limited experience it can vary a lot. For some of the companies I've worked I've seen this vary from 30% to more than 1000%. Also similar to what JR stated the big ticket item isn't marked up nearly as much as the available options, attachments, upgrades or what ever it might be depending on the product. Of course that is all for finished goods. This lumber would be more like a raw material I think. I really have no idea what they could be worth at this point.
867
« on: January 15, 2016, 05:20:00 PM »
I know they are charging about $5 a bd ft for new white oak which is what I think I have. Mostly in true 2x8 sizes ranging from about 8 to 14 feet long I think. I have no idea what the going rate for the old lumber would be though.
I also have about 40 total feet of 8"x8" beams.
Rough calculation I have over 600 bd ft.
Hmm.... I might have the funds to finish the master bath a little sooner then expected after all.
868
« on: January 15, 2016, 03:12:42 PM »
a request.
please stack and save the wood that you have ripped out of the house. preferably in a shed or barn or something like that out of the direct elements. you can get PREMIUM $$$ for that wood.
here are a few links to what places are asking for specialty wood like that in todays market, and that is not taking into account true old growth rough cut timbers.
https://www.google.com/?gws_rd=ssl#q=special+order+wood+stores
http://www.woodworkerssource.com/shop/category/Oak_Red.html
http://toolmonger.com/2008/03/19/whats-old-wood-worth/
I have it stacked as nice as I could covered outside right now. They were the only thing that did not go on the one of many burn piles. I'm actually heading a specialty hardwood warehouse either tomorrow or early next week. I purchased about 75 bd ft of hard maple from them to build some countertops. I glued the last counter top up last night and now will be bringing them all back to run them through there 36" wide drum sander. This place has all types of domestic hardwoods and brings in a bunch of exotic stuff too. I wonder if they would be interested in purchasing it or might now somebody who is. Never would have thought to ask them about it if you wouldn't have brought it up.
869
« on: January 15, 2016, 02:18:57 PM »
I'm guessing by the timeline those oak beams are native timber and that is right they are nothing like todays younger trees.......
That is correct. Those old beams and floor joists were true old growth timber.
870
« on: January 15, 2016, 01:26:30 PM »
brian, just by the looks of things, I am taking a guess that you are now living in the southern part of WI somewhere around dodgeville area...? that looks like old Norwegian craftsmanship?
A little north east of there. If I asked the mrs. she would be able to tell me what ethnicity the original builders were. Norwegian does sound correct though.
871
« on: January 15, 2016, 01:21:26 PM »
Yeah, those impacts work real slick. I wouldn't have had a hope trying to drive construction screws into those old oak beams with a normal drill but the impact driver didn't have a problem. The only thing I found a drill worked better for was hanging drywall.
get you a bar of regular bath soap and scrape the screw across it and it will go into that oak like a hot knife in warm butter.
Didn't think of that. I remember doing that as a kid. They were building a new park playground and my parents along with a bunch of others were helping build it. They had a bunch of kids pushing screws through soap. I was probably 6 or something at the time. I might have to take a screw and try it. This stuff if incredibly hard even compared to todays oak.
872
« on: January 15, 2016, 11:58:39 AM »
Yeah, those impacts work real slick. I wouldn't have had a hope trying to drive construction screws into those old oak beams with a normal drill but the impact driver didn't have a problem. The only thing I found a drill worked better for was hanging drywall.
873
« on: January 15, 2016, 11:47:15 AM »
I used 3/4" plywood. They do feel very solid. They were all glued and screwed in place. I cut the stair stringers from LVL planks. My stairwell is only 36" wide and I do have 3 stringers so there is only about 15" of unsupported area under each tread.
I had a nail gun which was used for a lot of the stud work but we drove a lot of screws also. Those small battery powered impact drivers with 1/4" hex drive are awesome for driving screw.
874
« on: January 15, 2016, 10:35:32 AM »
With some help we got all the addition removed and most of the new floor on in a weekend. The goal was for me to finish up the floor and get the new walls built after work during the next week as I was hoping to have help again the following weekend to install the new trusses. I got the new walls up and was ready to install trusses the following weekend. We used the neighbors skid steer again and a jig lift and set the trusses in place. By the end of the second weekend all the trusses were up and secured. 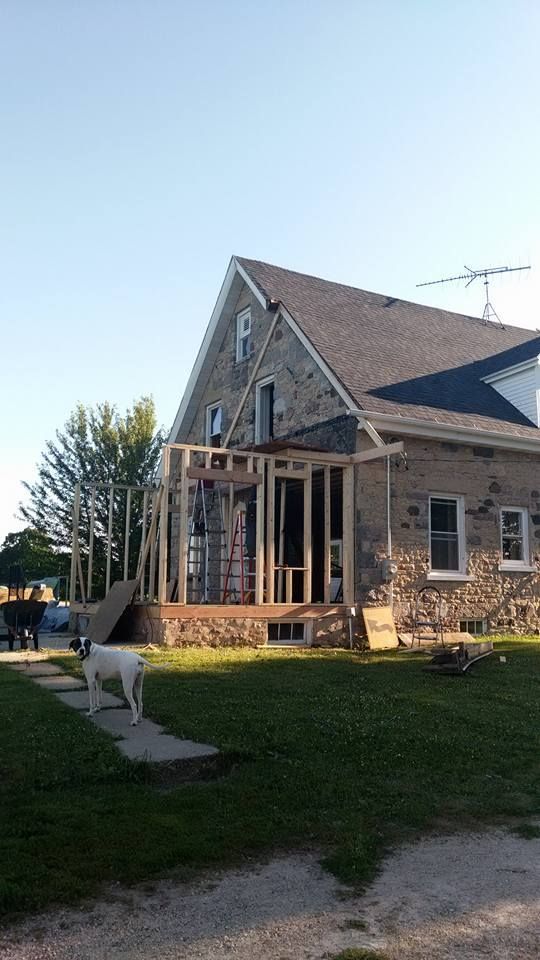  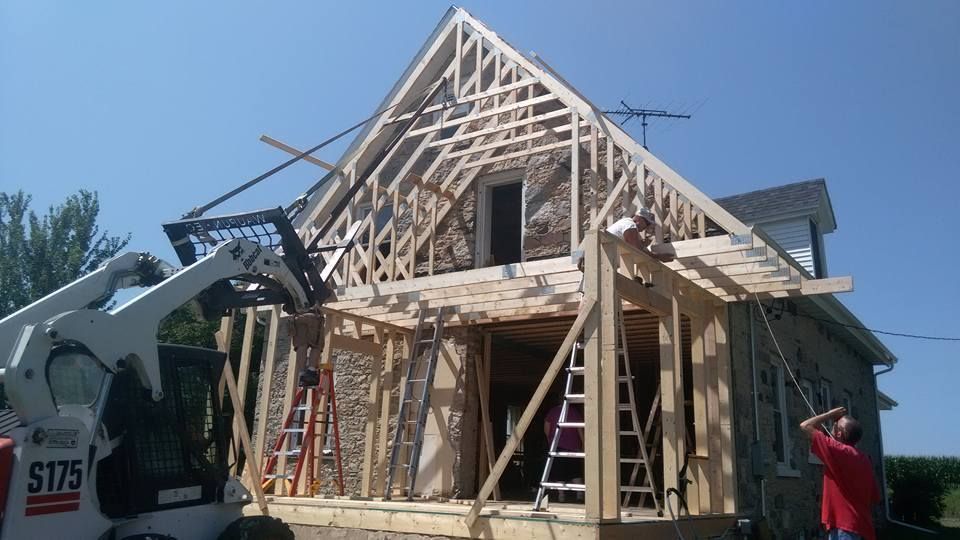 We ordered attic trusses so that there would be room in the trusses. This is where the master bath will go. I ordered the trusses myself and after some discussions with there engineers they assured me I would be safe going with 24" centers. Even with there assurance I still wasn't comfortable with that to I decided to do them on the 19.2" centers. That would be the diamonds on your tape measures. I think I remember reading a discussion on that in one of the threads here. 12", 16" and 24" centers come out even on 4'. If you want something between 16" and 24" centers 19.2 or the diamonds come out even on 8'.
875
« on: January 15, 2016, 10:25:53 AM »
Finally I decided it was time to re-do the addition. The construction of it wasn't done properly and I decided it would be easier to completely tear it off and re-build it instead of try and repair what was there. First thing I needed to move the electrical over that was hanging off the side of the house. In the future we plan on building a porch in front of the addition so it would need to move over. I rented a large hammer drill and coring bit from the hardware store and drilled a 3" hole through the 19" thick wall to pass the electric through. Then I called the electric company for a disconnect and moved everything over. 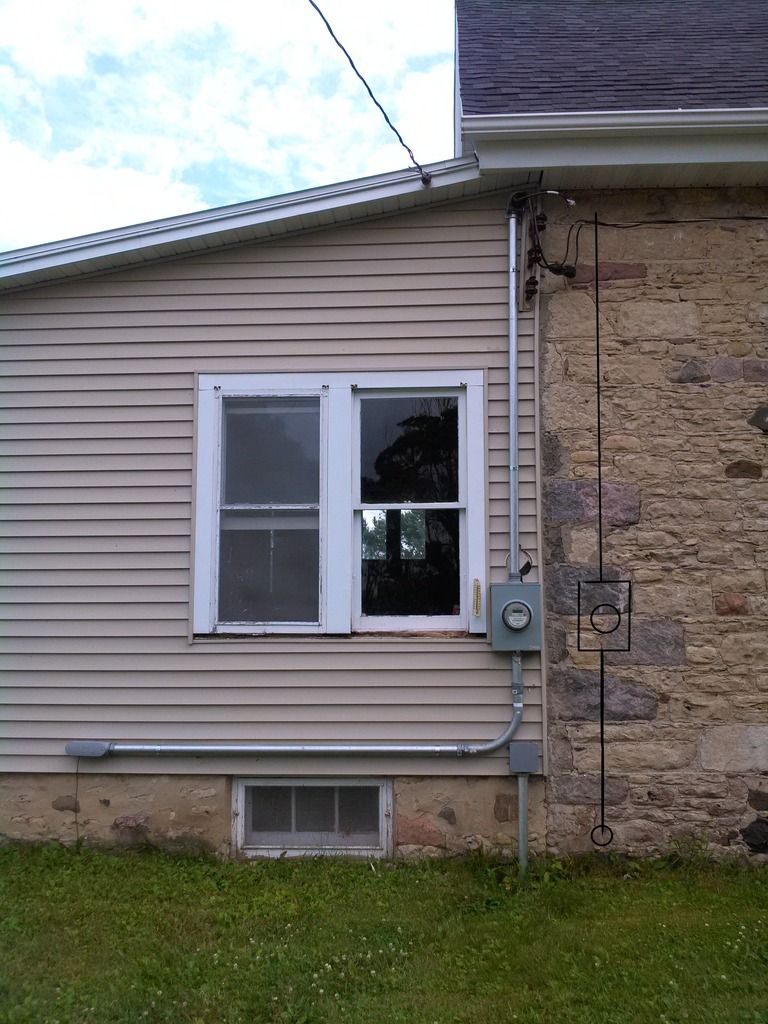 First the porch came off. Then the roof to the addition. Because it was just a lean-to roof and not built that well the roof came of easy. We decided to just grab the sawzall and haul the walls away whole and dump them on the burn pile. We grabbed the chain saw then and cut the floor in half and then hauled that away in two pieces. 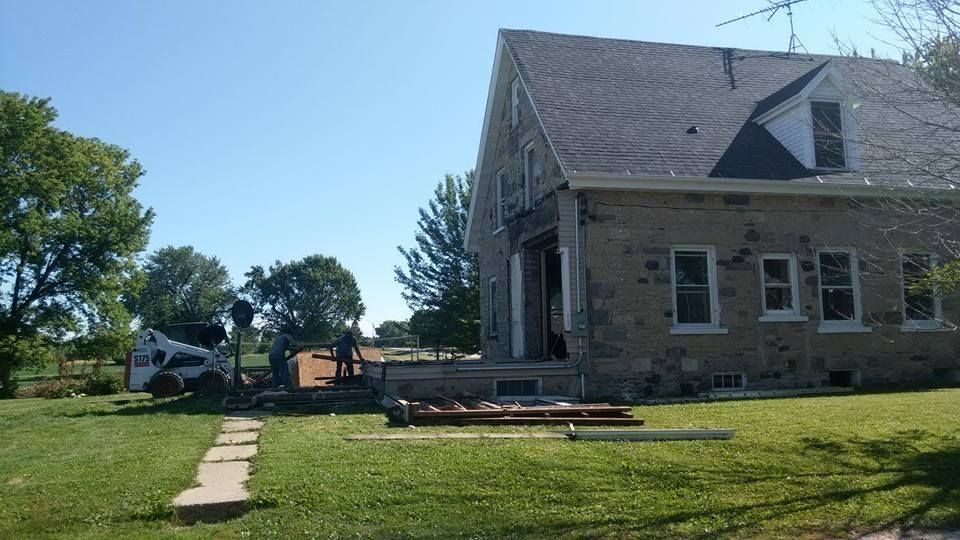  Down to the bear foundation we started building the new floor system for the addition. 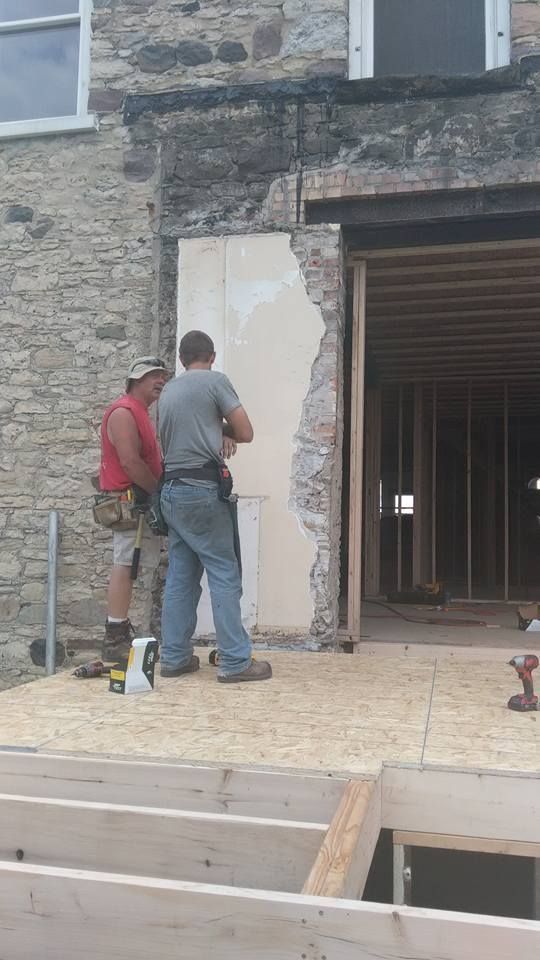 It was a very confusing summer for the dog. 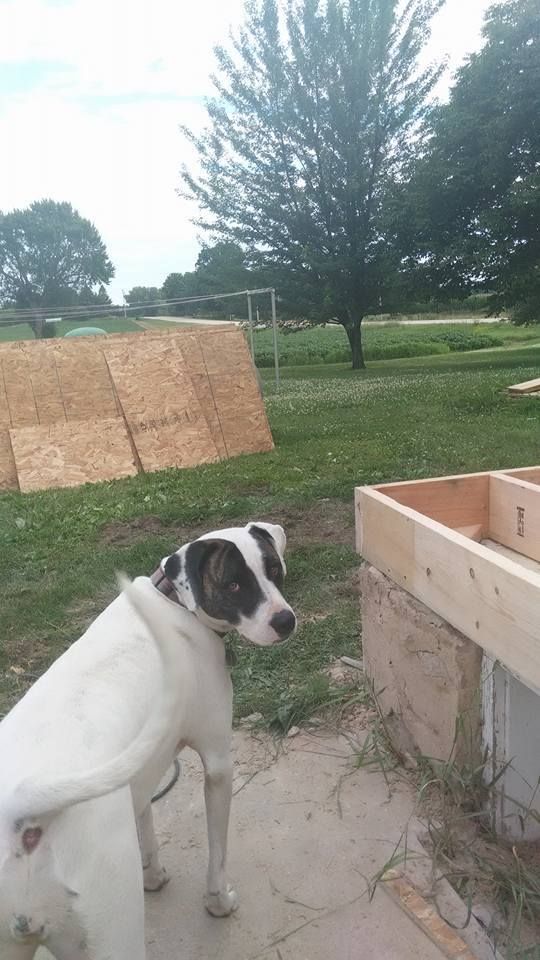
876
« on: January 15, 2016, 10:17:09 AM »
With the new floor down and second floor removed it was time to studding out the exterior walls. These walls would be load bearing holding the second floor up. I-joists would span the walls to create the floor. 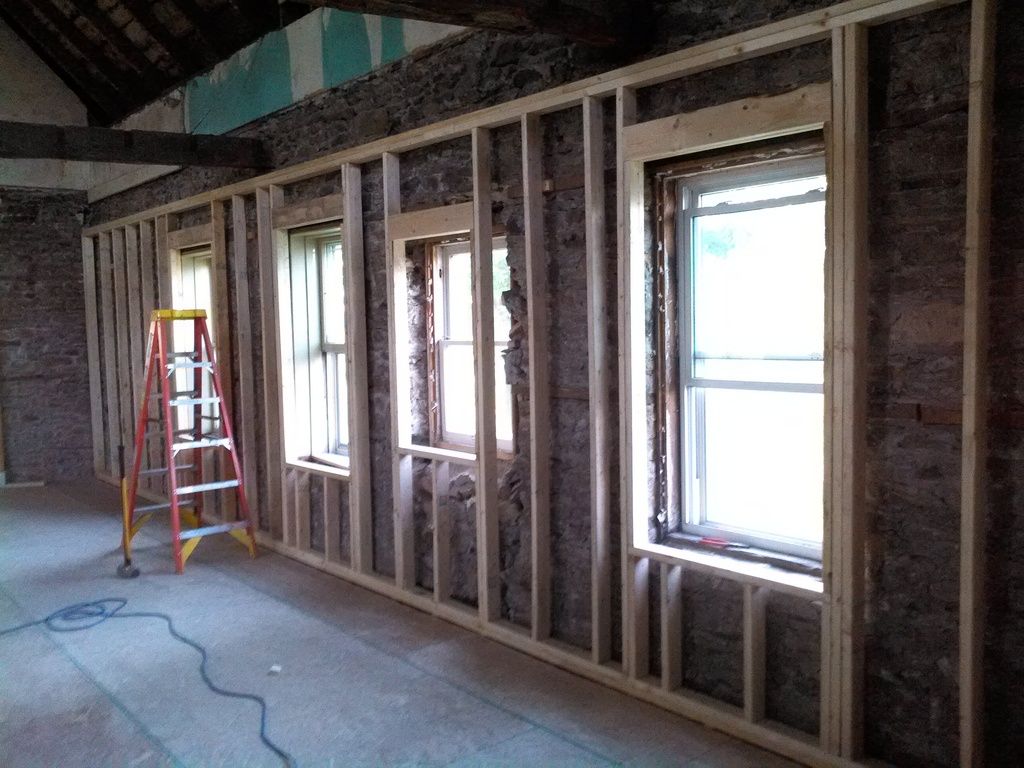  After the exterior walls were up we put the I-joists in place and then built the load bearing wall that would run down the center of the house. We had to take one of the old beams out. These beams were set in the walls and had a rod running from the beam up to the top of the wall anchored into a beam there. This beam didn't seem to be doing anything anymore as it was floating in the walls and held up by the rods. 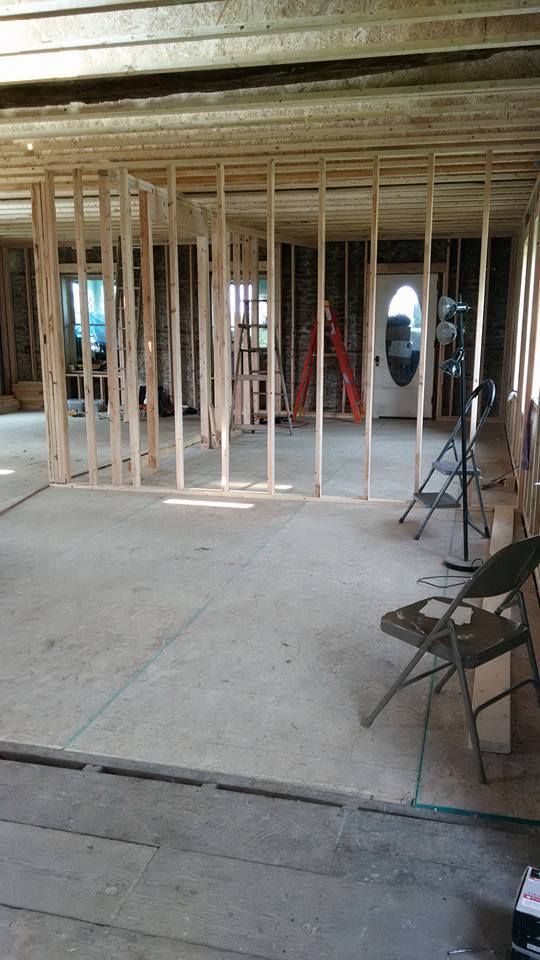 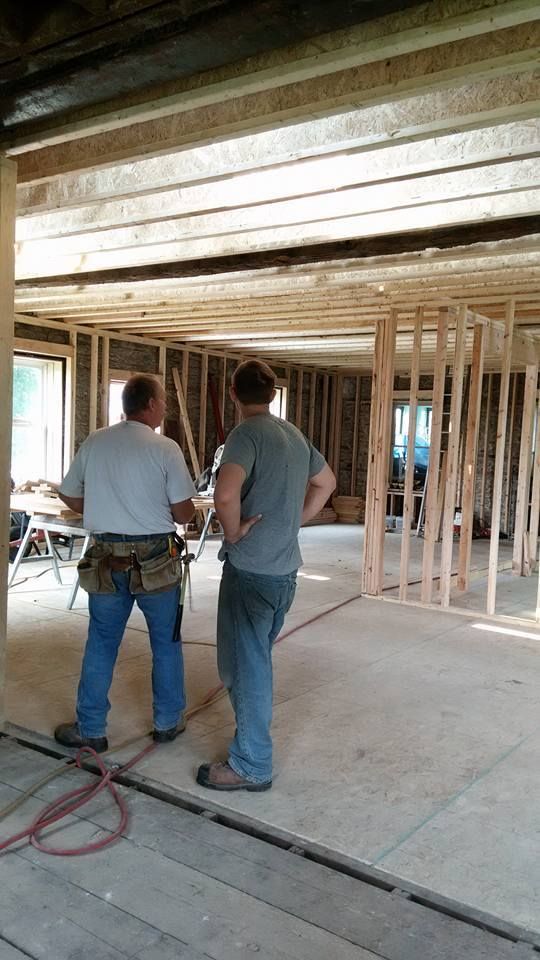 With the second floor in I built the stair way upstairs. This was one of the more challenging parts of the project. Laying the landings and treads out to come out correctly taking into account the flooring being used etc.. so it comes out correctly. For stairs to be to code there can only be a 3/8 difference in the rise of all the reads in a stairwell. I needed to deviate from the original plans here. With the way the stairs were layed out my rise was to great. I needed to add an additional stair in some place. I decided to add a stair between the two landings. This made the hall a little wider which was nice but ate into my office space a little. 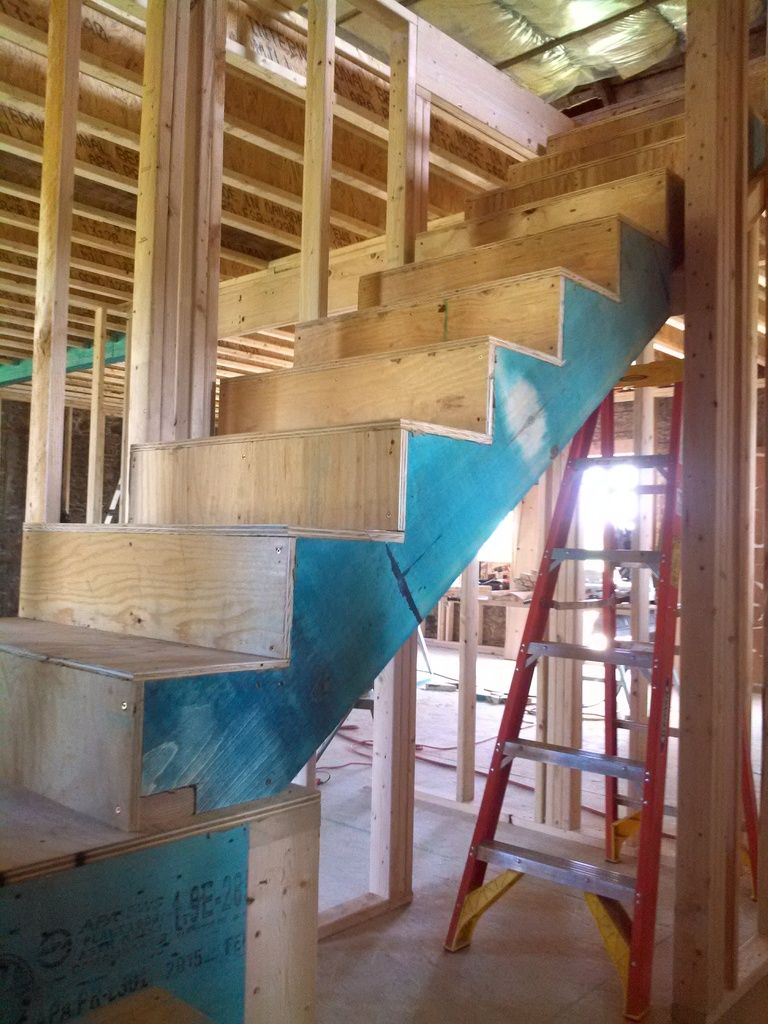
877
« on: January 14, 2016, 10:49:35 PM »
Looks like a great place!! ....if the walls could talk....
Actually the previous owner, Violet has stopped in a couple times. Her husband passed away years ago and the only reason she sold was because she knew it needed work and she didn't want to do it herself. Last time she brought a pile of old pictures. From the research we did Violet's husband's father purchased the home from the man who built it. She knows a good bit of history on the place since that point. I didn't see the pictures as I had a crew of guys helping me that weekend and I couldn't afford to take the time to visit with her. My wife did though and I guess there used to be an old stone barn on the property that would have drawfed the house. Unfortunately a lightening strike hit it and burned the barn down I'll n the 70s I believe. My wife is currently in contact with her grand daughter who is working on scanning and sending us a bunch of pics as well as some other history. I'm sure Violet will stop in at some point this spring again to check it out and we will get a chance to talk about the GH history of the place some more.
878
« on: January 14, 2016, 10:32:37 PM »
Praying that the Lord guide you and your wife through any differences you may be having and lead you back to happiness.
879
« on: January 14, 2016, 04:10:11 PM »
Lovely old home. Know it will appreciate the love and care you are giving it. Look forward to more updates.
Sent from my iPhone using Tapatalk
It was definitely in need of a little TLC when we bought it. The first winter we lived in it was extremely cold. It was mid November and already cold. We were having problems with a drain in the basement occasionally backing up. Though we had fixed it earlier in the fall but then the week before I was supposed to head up north for deer season it backed up and wasn't going back down. (The WI deer season gun hunt is 9 days. Opens Sat morning and closes the following Sun evening. Always during the week of Thanksgiving.) I had determined the problem must be in the septic tank. This was an old tank with a ceramic 9" access pipe. I was also about to find out it was all of 12' deep. I headed up north for the weekend to go deer hunting with the intention of coming back home Sun evening to work on the septic instead of hunt all week like I had planned. Monday morning I hook up to the trailer and drive into town to rent a mini excavator. The temps had plummeted over the weekend and highs were already in the single digits. This is extremely cold real fast for WI. The newer excavator with the enclosed heated cab was out so I got the older open cab. Lucky I did too because the newer one only had a 10 ft reach and I used every bit of that old excavators 12 ft reach to just scrape the top of my tank. Spent the rest of the day digging a big hole in my yard to unbury the tank and first part of the drain field pipe. Loaded the excavator up the next morning and exchanged it for a jack hammer. It was time to make that 9" access hole a 2' access hole so I could replace it with a new standard sized one. After having the tank pumped out (again) I was able to determine the steel outlet pipe to my drain field had completely rotted and collapsed. I spent most of Wed morning with a hammer and chisel pounding and beating out the old pipe so I could slide a new pvc pipe into its place. It is now Wed afternoon. The day before Thanksgiving. I expect my wife to be home at any moment. she thinks we are going to load the dog up as soon as she gets home and make the 2-1/2 drive north for Thanksgiving dinner as soon as she gets home. Instead I told her to go inside and change. We needed to clean all the rook and other debris out of the tank before we could close it up. I go into the garage and grab a couple 2 gallon buckets. I jump into the hole and start handing her bucket after bucket of dirt, rock, and composted waste from the bottom of the tank. She takes the buckets and dumps them in the hole by the drain pipe. A couple hours later we finish up, take a shower and head up north. Thursday night my dad comes back with us. Early Friday we borrow the neighbors skid steer. Drop the new 2' ft concrete access in place. Mix up some quickcrete to seal it up and seal the new drain pipe in. Then use the skid steer to fill the hole back in. Then we both headed back up north so I could atleast try and get a couple days of hunting in.
880
« on: January 14, 2016, 01:36:33 PM »
Next up was pulling all the floor joists for the second floor. Instead of trying to re-use the old beams and joists which were motared in we planed on build studded walls around the exterior and putting in I-joists. Removing the old joists was easy. They were just notched into the beams and they pulled right out of the walls. Load of old floor joists. All the beams and floor joists were oak lumber. This stuff was hard. It was almost impossible to drive a nail straight into one of these. If you nailed a new board up to one and then had to pull it apart you would pull the nail of the head through the new lumber before pulling the shank out of the old joist. 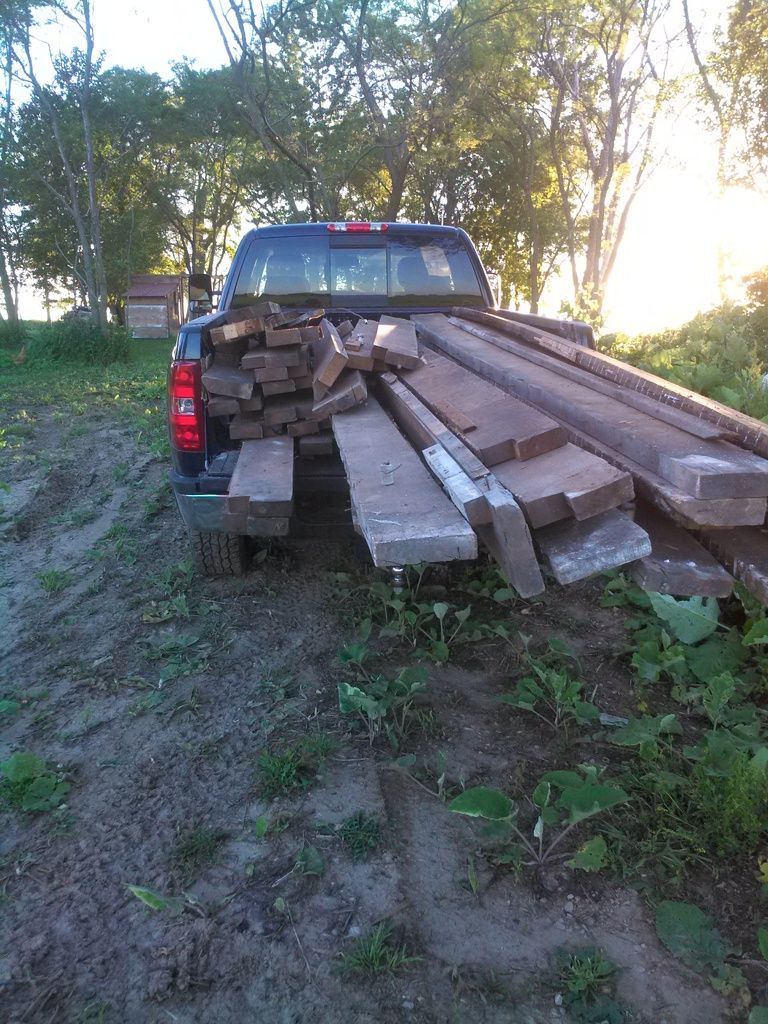 All the old joists removed. Ready to start framing walls. 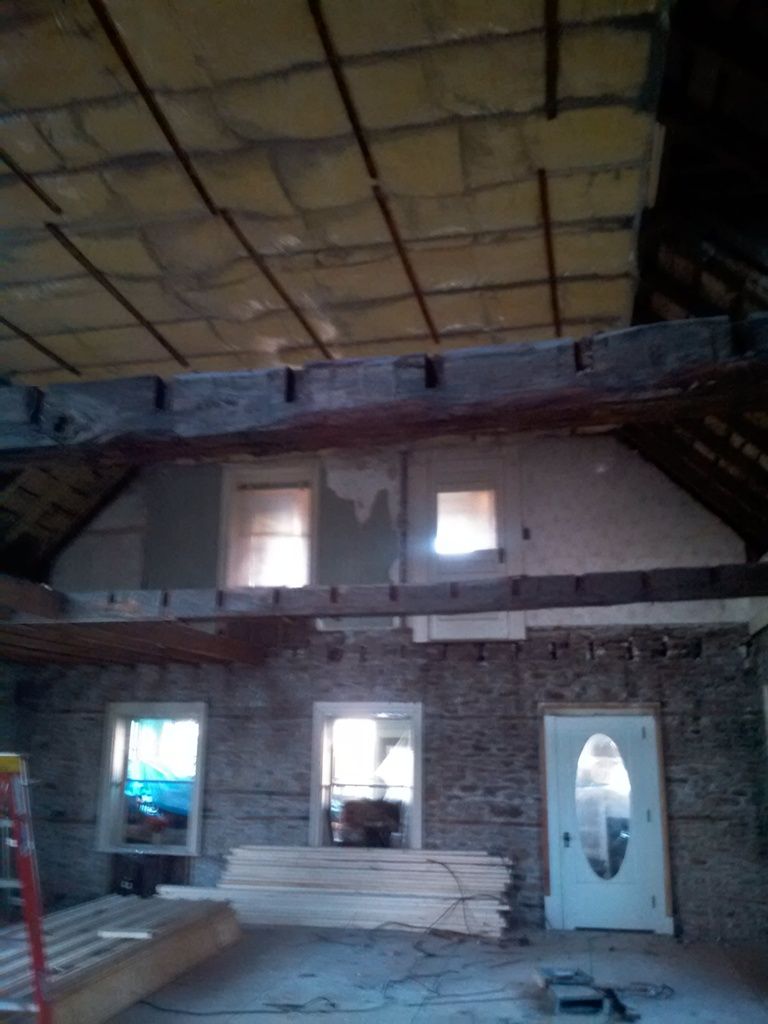 In this pick you can see the insulation we had put in the attic. We purchased the property in the spring. Before the first winter we demoed the upstairs removing all the walls and ceiling. (the upstairs was un-livable the way it was when we bought it.) We then hung some plastic and I purchased some fiberglass batts to insulate the attic with. There was basically no insulation up there when we bought it.
881
« on: January 14, 2016, 01:19:52 PM »
At some point in mid to late may I had all the first and second floor gutted and all the pine floor boards pulled off the joists. The plan was to remove the main beam going through the center of the house. When we purchased the house the main beam was in ok shape but there were a few issues. One of the metal posts holding it up was rotted off at the bottom and doing nothing. There was also a stone wall in the basement under part of the main beam. Upon inspection I found the stone wall wasn't load bearing, just a room divider. When I took the stone wall out I found a second, cedar post buried in the wall completely rotted. This post was under a splice in the main beam. In this portion of the house the floor was about 9" lower than flat. In addition this caused the main beam to twist. It was decided to remove and replace the beam instead of trying to repair and strengthen it. One side of the floor joists were mortared into the walls of the house. The other side notched into the beam. We started by supporting all the joists on the beam side and then cutting them free of the beam. We removed the old beam separating at the splice and built a new beam from 2x 10 material. The beam ended up being 13" wide to span the gap between the cut off floor joists. New 2x10 floor joists were sistered along side the old joists so a new flat floor could be built. The old joists has about an 1" of sag in the center of them. After the beam was built, joists were sistered and hung with new brackets we put 3/4" tongue and groove OSB down for the new sub-floor. Screwing and gluing each piece. I was able to get a large enough crew of friends and family together to get most of this done in one long weekend. Ready to start cutting off floor boards to take the old beam out: 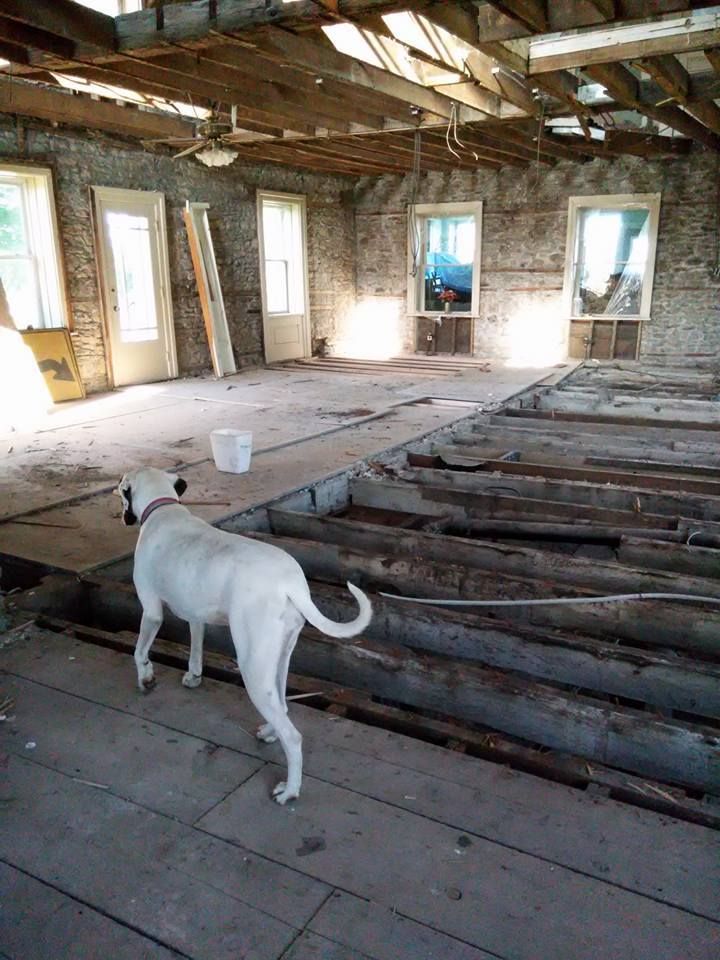 New beam in and attaching floor joists. 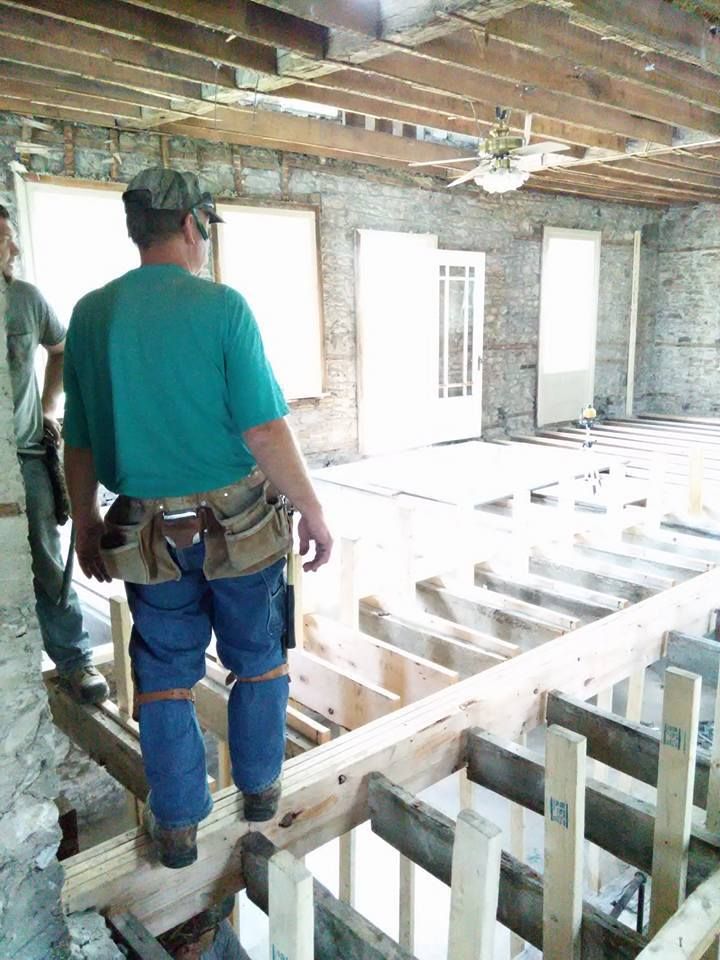 Checking level before sistering new floor boards on second half. 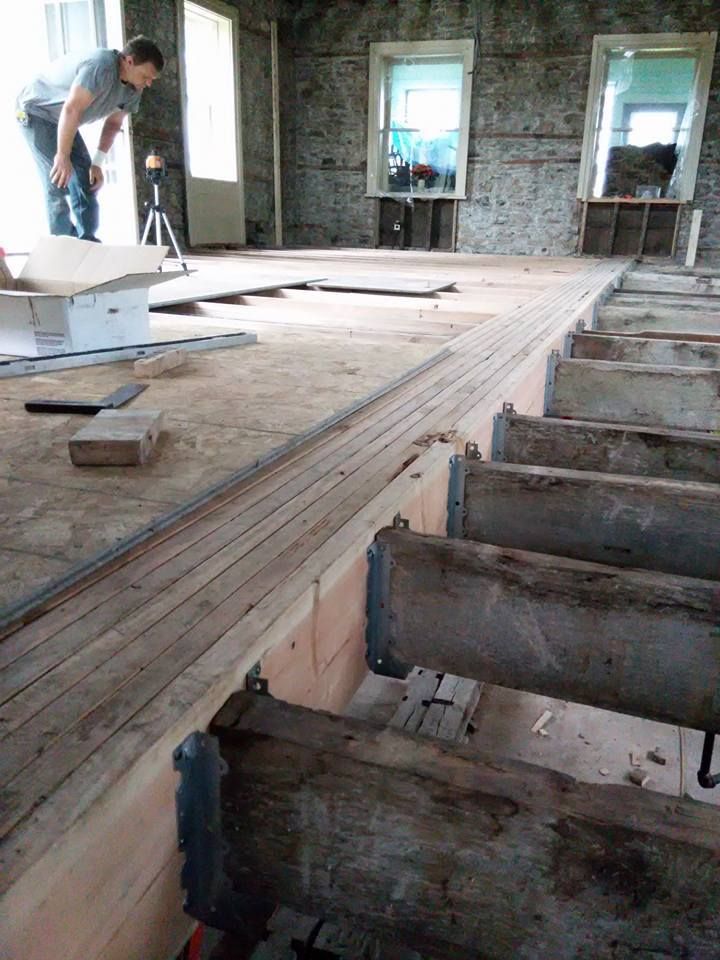 As you may be able to see I have my left arm wrapped up here. The night before I rode on of the cut-off floor joists into the basement. I ended up going in for 5 stitches in my leg. Luckily no real damage was done and this was the worst of the injuries to occur during the whole remodel. The new sub-floor layed down. 
882
« on: January 14, 2016, 10:45:11 AM »
We starting moving everything out mid-April to get ready for demo. The initial plan was to demo and then rebuild one half. Then demo and rebuild the second half. We started out by taking up the old hardwood floors. We were considering trying to re-use some of the original hardwood floors so I took every piece up carefully. Amazingly for how old this stuff was I was able to safe 95% of it.  After the flooring was gone it was time to start the real demo work. Taking out the latte and plaster. Lattes were loaded in my truck and moved to a burn pile. Some of the plaster was also dumped in the bed of the truck and then dumped in a pile in the back corner of the property where a barn foundation was. The intent being to bury it all later.  I removed nearly all of the latte and plaster and loaded up and hauled it away myself. After seeing how the framework and beams were constructed for the second floor I quickly realized the initial plan was not going to work. We were going to need to demo the whole place at once.  At some point I borrowed the neighbors dump trailer to assist with the demo work. Loaded everything into the wheel barrow and dumped in into the dump trailer. From there I dumped it on the pile. All the lathe/ non-burnable to be buried and all the wood in a pile to burn.
883
« on: January 14, 2016, 10:27:02 AM »
The summer after we bought it the insurance company required us to update the electrical. The house was still running of 60 amp, in a fuse box, with a lot of knob-and-tube wiring. I had a buddy at work who was a licensed electrician come out and help me get a 200 amp service installed with circuit breakers. We replaced some of the knob-and-tube but left most of it. At the same time a buried a line capable of handling a 200 amp service to the garage and area where I hope to build a shop in the future. The line that was running to the garage could only handle 20 amps. This wasn't going to work to run my welder, air compressor and some of my other tools.
Last summer we started talking to a couple different designers and had a set of floor plans drawn up that we liked. We decided to start remodeling starting spring 2014.
884
« on: January 14, 2016, 10:21:16 AM »
The house was original built in 1856. My wife did a lot of research on the home and previous property owners. After over 150 years my wife and I are only the fourth owners of the property. It was obvious much of the home was still original and the rest hadn't been touched since the 60's. A lot of it was in bad shape. At some point the original owners added a little addition. The summer kitchen was built early in the 1900'. Then at some point one of the owners decided to take the Summer kitchen off and use it as a hog barn. In it's place they built this lean-to, which I hated. It looked so out of place on the house. It was decided we would tear the roof off at some point and add trusses to match the existing roof line. 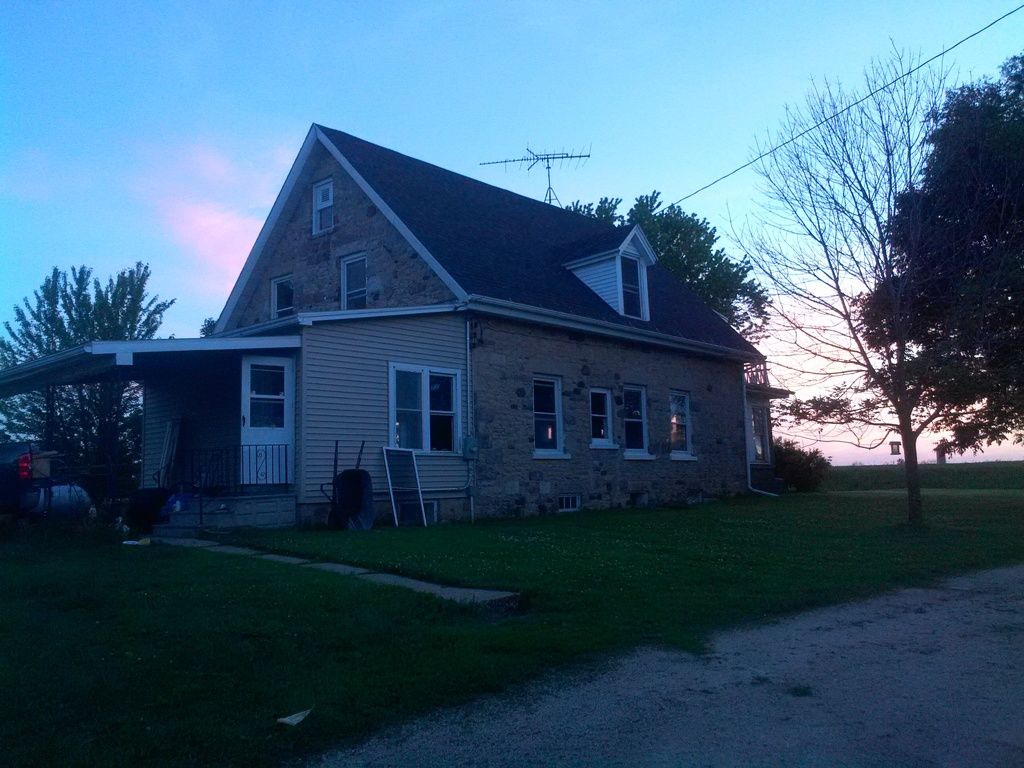
885
« on: January 14, 2016, 10:15:51 AM »
I thought I would post up the "remodel" job my wife and I did on our home over the past summer. The finishing touches are still ongoing but for the most part we got it finished up. I use the term remodel somewhat loosely here. Basically we built a new house inside the old one. We purchased the house and about 2 acres about three years ago. We were looking for something out in the country somewhat close to where we both work and with a little bit of land. The home was originally part of a farm and was part of a 40. Here are a few pics of what it looked like before we started. 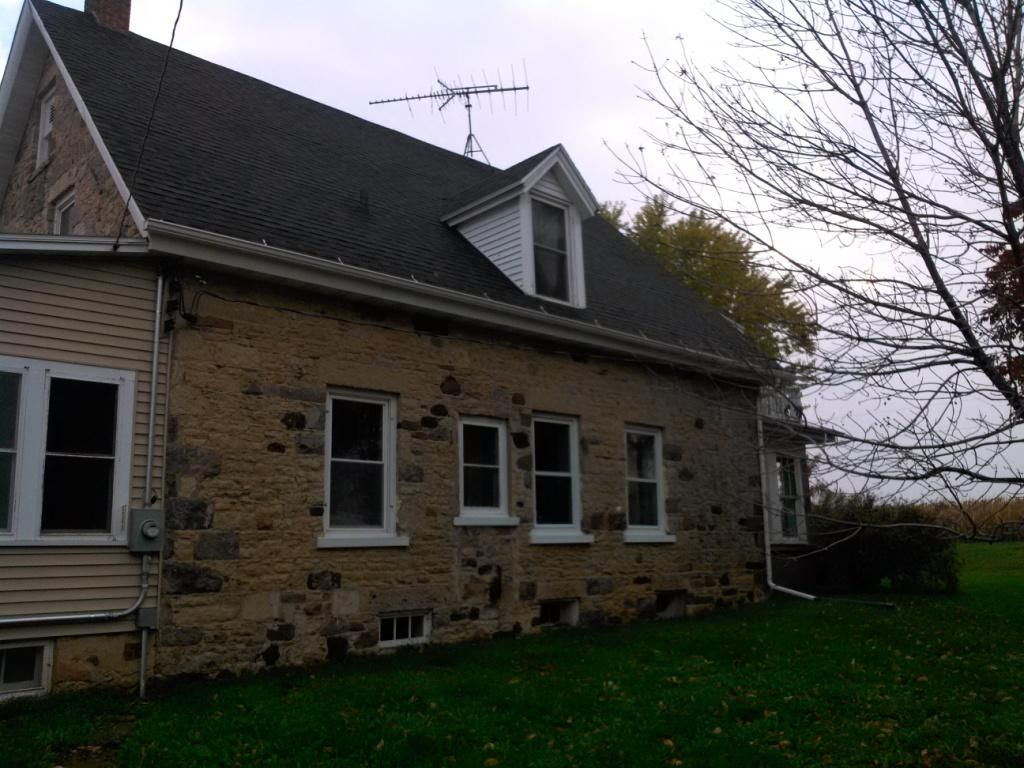 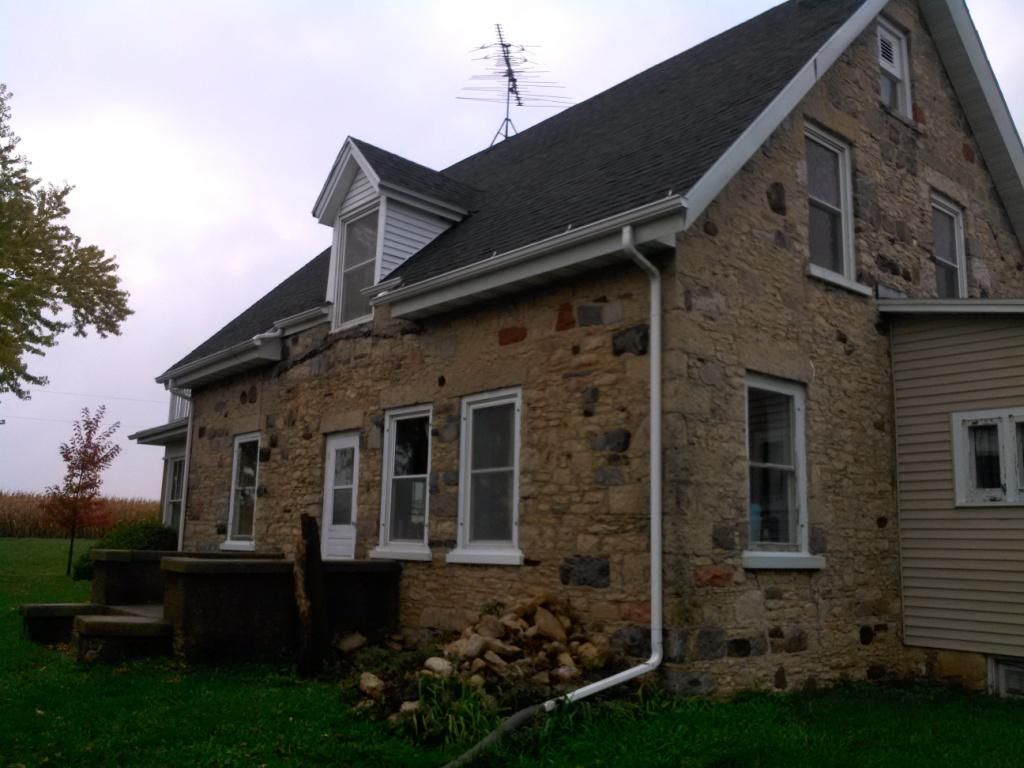 I didn't have much for interior pics before we started. I will see if the wife has any stored some place. When we purchased it the plan was to do a major renovation. Initially we didn't plan on doing this much but then decided we should just go all in.
886
« on: January 14, 2016, 10:05:09 AM »
Nice looking shelves and bench. I need to build something like that in the basement.
887
« on: January 13, 2016, 01:22:56 PM »
A lot of guys up here run a infrared radiant heat system on the ceiling of there shops. What is nice about them is it heats the objects in the room up not so much the air. Those objects then heat the rest of the room up. So the wrench or whatever else you might be grabbing isn't so cold.
It would probably also cost a lot more but it is also nice to steel the walls and ceiling also. Don't have to worry about sparks etc.. nearly as much. No painting and helps a lot with lighting. I am guessing for the guys running those radiant heaters it also helps heat the room up too.
888
« on: January 12, 2016, 01:52:33 PM »
#1 Isn't entirely true. Broken or not an engineer will always believe it can be done better.
889
« on: January 12, 2016, 01:43:07 PM »
welcome back Brian. you still helping with the farming or have you found other endeavors?
No more farming for me. Since I've been done with school I haven't been on the farm much. If I get a change I will stop in at the farm when I am visiting the parents/ around the holidays but after getting married and buying a house etc.. those occasions are fewer and farther between.
890
« on: January 12, 2016, 01:23:12 PM »
Thanks all.
The honey-do list is far from complete but we have been over the hump since shortly before Christmas.
891
« on: January 12, 2016, 10:22:45 AM »
Angle's easy... it's the length that would throw me for a loop. No two studs will be the same length except along the back wall. Guess that's why i'm not a professional framer!
[/quote]
If you know the angle, which as you stated would be easy the length wouldn't be any more difficult. Use the angle to figure our how much it rises/ drops over 16" or whatever your stud spacing is and add that to each frame. Easy way to figure it out is measure the difference from the front to back and total length of wall. The difference will be your rise over run. Multiply that by your span and that tells you how much to increase each stud.
And I would actually think it would be easier to frame the slope. You will have to cut each piece to length so a little extra time planning in the beginning but you can use a continues sill plate. In my opinion that would more than make up for the little bit of extra planning and save you materials also.
892
« on: January 12, 2016, 10:14:28 AM »
It has been almost a year since I signed up and made my first couple of posts but I am hoping I will have time to be more involved in the future. I am a bit younger than most of the crew over here at just under 30. I am a mechanical engineer and run (possibly used to run) a small side business building bumpers for the Chev/GMC HD trucks. I put that on hold over the summer as my wife and I completely remodeled our house. (I will probably start a thread and post some of the pics/ progress of that up for those interested.) Need to finish that up here shortly though as we are expecting our first this summer. Like most of you guys here I enjoy wrenching and hunting/ shooting.
Brian
893
« on: February 26, 2015, 10:07:55 PM »
the bumper is lookin good ken, I sent an invite to somebody that builds bumpers for a living and thought he may have some knowledge to impart on us all.
It took me a little while to get over here but I thought I might make a few comments after reading through your thread. I know you already have it finished up but I thought it could be helpful for anybody that might be reading this and thinking about building there own or if you decide to build a front bumper. The bumper looks great. My only real comment is that you made it a lot heavier then what it needs to be. An important thing to keep in mind is the direction forces are applied. Think about the situations forces will be applied and then analyze material shape and direction. Just a couple examples. After moving your recovery mounts you added a bunch of extra re-inforccement that really wasn't needed. The mounting brackets mounting the bumper to the frame need to be heavy enough to withstand a rear impact from another vehicle from speed. The recovery brackets on the other hand will see a completely different type of loading. This will be a much less dynamic and slower loading situation and the instantanious stresses will be much lower than those seen from a rear impact. A second example would be the extra supports you added to the side of the bumper. The gerenal shape of the bumper a depth of it offers a good bit of strength in a side loading situation. Consider the amount of force that would be required to bend that much steel. Also consider how much of a side load it would take to do permenant damage to the frame. It really doesn't take that much of an impact on the rear quarter panel to cause damage to the frame due to the over all length of the truck and the heavy diesel engine up front (think of it as a long arm and heavy weight on one end). You would probably bend the frame before pushing your bumper into the quarter panel. Also consider what you will be hitting or hitting you to cause that much force. The most realistic situation would be another vehicle hitting you. Unless that vehicle is also equipped with a heavy steel bumper the amount of force required to bend your rear bumper into the quarter panel would be more than enough to cause the front of the other vehicle to deform enough for parts of it to come in contact with your rear quarter panel. Just a couple of examples of why these bumpers do not need to be built nearly as heavy as most people think they do. I build most of my bumpers and parts from 3/16s material. Many people try to convince me this is not thick enough when in reality it is. I generally do not try to argue these types of points with people or bother to point them out but it seems this crowd is smart enough to actually think through these situations and reason them out instead of just saying it needs to be a 1/4" or more. (You ever notice how everything people fab up themself needs to be atleast a 1/4" and of course more is always better for some reason?) In the grand scheme of things a few extra pounds (or 50) isn't going to hurt anything in the rear of these trucks. I would not say the same thing for the front and would try to limit the amount of un-needed re-inforcement and weight on the front bumper. If you start building the front bumper and want any tips on where to start etc.. let me know.
|


